Whole Wheat Pita Bread Recipe
Learn how to make homemade whole wheat pita bread with perfect pockets every time! This easy baking recipe uses simple ingredients for authentic, nutritious flatbreads that puff beautifully. Master the technique for the best whole wheat pitas that are far superior to store-bought versions.
Difficulty:
Intermediate
Prep Time:
2 hours 30 mins
Cook Time:
15 mins
Serves:
8 pitas
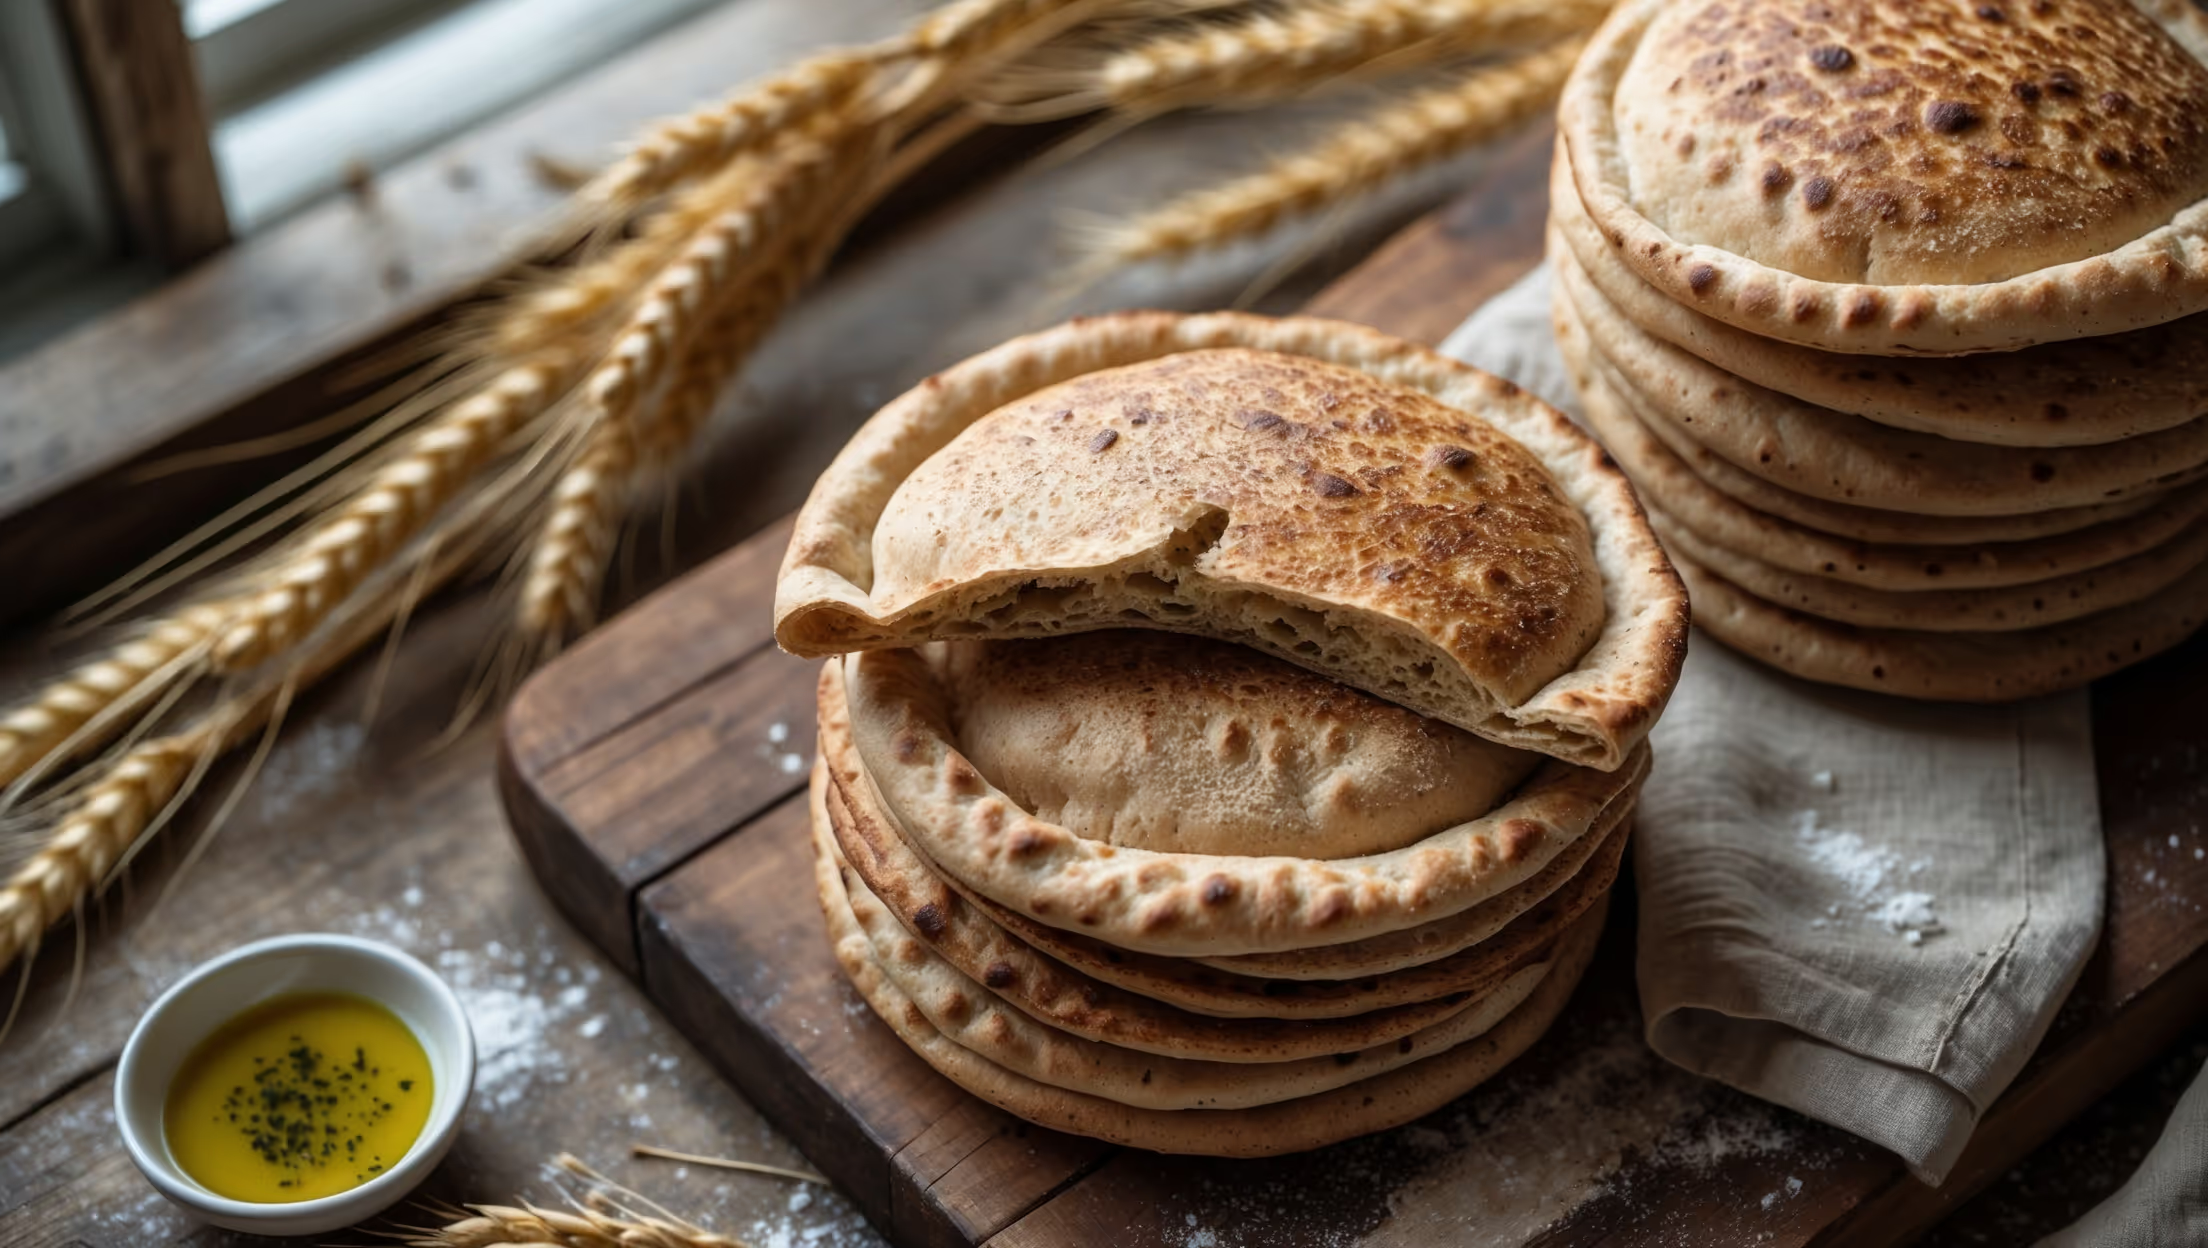
An overhead shot of freshly baked whole wheat pita breads stacked partially on a rustic wooden board, with one cut open to reveal its perfect pocket. Natural light streams in from a nearby window, highlighting the golden-brown speckled exterior and the soft, steam-releasing interior. Scattered around are wheat stalks, a small bowl of olive oil with za'atar, and a linen napkin dusted with flour. The contrast between the earthy tones of the whole wheat pitas and the warm wooden background creates a homey, artisanal atmosphere that showcases the bread's hearty appeal and handmade quality.

Ingredients

<ul class="ingredients-main-list"><li class="ingredients-single-item">300g whole wheat flour</li><li class="ingredients-single-item">100g all-purpose flour (for a lighter texture)</li><li class="ingredients-single-item">1 tbsp honey (or maple syrup)</li><li class="ingredients-single-item">2 tsp active dry yeast</li><li class="ingredients-single-item">1 tsp salt</li><li class="ingredients-single-item">2 tbsp olive oil</li><li class="ingredients-single-item">275-300ml warm water (40-43°C/105-110°F)</li></ul>

Equipment

<ul class="equipment-main-list"><li class="equipment-single-item">Stand mixer with dough hook (optional)</li><li class="equipment-single-item">Pizza stone or heavy baking sheet</li><li class="equipment-single-item">Kitchen towel</li><li class="equipment-single-item">Rolling pin</li></ul>

Directions

<ol class="no-list-style"><li class="MethodStepper"><h4 class="step-title">Step 1</h4>Begin by activating the yeast. In a small bowl, combine 75ml of the warm water (40-43°C/105-110°F) with the honey, stirring until dissolved. Sprinkle the yeast over the top and let it sit for 5-10 minutes until foamy. This foaming action confirms your yeast is alive and active - crucial for proper rising.</li><li class="MethodStepper"><h4 class="step-title">Step 2</h4>In a large mixing bowl or stand mixer bowl, combine the whole wheat flour, all-purpose flour, and salt. Make a well in the center and pour in the activated yeast mixture, olive oil, and about 175ml of the remaining warm water. Mix initially with a wooden spoon or on low speed with a dough hook.</li><li class="MethodStepper"><h4 class="step-title">Step 3</h4>Gradually add the remaining water as needed to form a soft, slightly tacky dough that cleans the sides of the bowl. Whole wheat flour absorbs more moisture than white flour, so be patient and adjust accordingly - you'll know it's right when the dough feels slightly tacky but not sticky.</li><li class="MethodStepper"><h4 class="step-title">Step 4</h4>Knead the dough for 8-10 minutes by hand on a lightly floured surface (or 5-6 minutes in a stand mixer). The dough should become smooth and elastic - when you press it gently with your finger, it should slowly spring back. This extended kneading develops the gluten structure necessary for proper pocket formation.</li><li class="MethodStepper"><h4 class="step-title">Step 5</h4>Shape the dough into a ball and place in a lightly oiled bowl, turning once to coat. Cover with a damp kitchen towel or plastic wrap and let rise in a warm, draft-free spot for 1-1.5 hours, or until doubled in size. The slow rise develops flavor and texture in your pitas.</li><li class="MethodStepper"><h4 class="step-title">Step 6</h4>Once risen, gently punch down the dough to release air bubbles and transfer to a lightly floured work surface. Divide the dough into 8 equal pieces (using a kitchen scale helps ensure uniformity). Shape each piece into a ball by tucking the edges underneath and rolling between your palms.</li><li class="MethodStepper"><h4 class="step-title">Step 7</h4>Cover the dough balls with a kitchen towel and let rest for 15 minutes. This relaxes the gluten and makes rolling much easier. Meanwhile, place your pizza stone or heavy baking sheet in the oven and preheat to 250°C (480°F). The stone needs to be scorching hot to create the steam necessary for pocket formation.</li><li class="MethodStepper"><h4 class="step-title">Step 8</h4>Working with one ball at a time while keeping others covered, roll each into a circle about 18cm (7 inches) in diameter and 5mm (¼ inch) thick. Aim for even thickness throughout - thinner centers and thicker edges won't puff properly. Let the rolled pitas rest for 5 minutes before baking.</li><li class="MethodStepper"><h4 class="step-title">Step 9</h4>Carefully place 2-3 pitas (depending on your stone/sheet size) directly onto the hot stone or baking sheet. Bake for 2-3 minutes until they puff dramatically and the tops begin to take on a light golden color. Don't be tempted to open the oven door during the first minute - the trapped heat creates the steam that forms the pocket!</li><li class="MethodStepper"><h4 class="step-title">Step 10</h4>Remove pitas with tongs and wrap immediately in a clean kitchen towel to keep them soft and pliable as they cool. Continue with remaining dough. Allow pitas to cool completely before cutting open or storing. Enjoy your fresh whole wheat pitas with your favorite fillings, or alongside dips like hummus and baba ganoush.</li></ol>

FAQs

Find answers to your most pressing questions about this delicious recipe right here.

What ingredients are used in Whole Wheat Pita Bread Recipe?

Whole wheat pita bread requires whole wheat flour, all-purpose flour, active dry yeast, honey, salt, olive oil, and warm water. This combination creates a nutty-flavoured bread with perfect pockets while maintaining a soft, chewy texture.

How to cook Whole Wheat Pita Bread Recipe at home?

Learn how to cook Whole Wheat Pita Bread by first activating yeast with honey and warm water, combining with flours, salt and olive oil, then kneading thoroughly. After rising, divide into portions, roll into discs, and bake on a scorching hot pizza stone or baking sheet at 250°C for 2-3 minutes until they dramatically puff up, creating perfect pockets.

Why won't my flatbreads puff up properly to form pockets?

Several factors affect pita puffing: insufficient kneading (gluten development), uneven thickness when rolling, oven not hot enough, or opening the oven too early. Ensure your oven preheats thoroughly with the stone/sheet inside, roll evenly to 5mm thickness, and avoid peeking during the first minute of baking.

Can I make these pita breads entirely with whole wheat flour?

Yes, you can use 100% whole wheat flour, but expect a denser texture and slightly less dramatic puffing. Increase water by about 25ml as whole wheat absorbs more moisture, and consider extending kneading time to develop adequate gluten structure for pocket formation.

How should I store homemade pita bread and how long does it keep?

Store cooled pitas in an airtight container or ziplock bag at room temperature for 2-3 days. For longer storage, freeze in a single layer, then transfer to a freezer bag for up to 3 months. Refresh before eating by sprinkling with water and warming in a 180°C oven for 3-4 minutes.

Want to try something else in ...

Whole Grain Bread

Try following recommended recipes
{ "@context": "http://schema.org/", "@type": "Recipe", "name": "Whole Wheat Pita Bread Recipe", "author": { "@type": "Person", "name": "Gurbir Aujla", "brand": "What's Baking?", "jobTitle": "Baker" }, "datePublished": "2024-06-20", "description": "Learn how to make homemade whole wheat pita bread with perfect pockets every time! This easy baking recipe uses simple ingredients for authentic, nutritious flatbreads that puff beautifully. Master the technique for the best whole wheat pitas that are far superior to store-bought versions.", "prepTime": "PT2H30M", "cookTime": "PT15M", "totalTime": "PT2H45M", "keywords": "whole wheat pita, homemade flatbread, pita pockets, Mediterranean bread, healthy bread", "recipeYield": "8", "recipeCategory": "Bread", "recipeCuisine": "Mediterranean", "nutrition": { "@type": "NutritionInformation", "calories": "160 calories", "carbohydrateContent": "30 g", "proteinContent": "5 g", "fatContent": "3 g", "saturatedFatContent": "0.5 g", "cholesterolContent": "0 mg", "sodiumContent": "240 mg", "sugarContent": "1 g", "servingSize": "1 pita" }, "recipeIngredient": [ "300g whole wheat flour", "100g all-purpose flour", "1 tbsp honey (or maple syrup)", "2 tsp active dry yeast", "1 tsp salt", "2 tbsp olive oil", "275-300ml warm water (40-43°C/105-110°F)" ], "recipeInstructions": [ { "@type": "HowToStep", "name": "Activate Yeast", "text": "In a small bowl, combine 75ml of the warm water (40-43°C/105-110°F) with the honey, stirring until dissolved. Sprinkle the yeast over the top and let it sit for 5-10 minutes until foamy. This foaming action confirms your yeast is alive and active - crucial for proper rising." }, { "@type": "HowToStep", "name": "Mix Dry Ingredients", "text": "In a large mixing bowl or stand mixer bowl, combine the whole wheat flour, all-purpose flour, and salt. Make a well in the center and pour in the activated yeast mixture, olive oil, and about 175ml of the remaining warm water. Mix initially with a wooden spoon or on low speed with a dough hook." }, { "@type": "HowToStep", "name": "Form Dough", "text": "Gradually add the remaining water as needed to form a soft, slightly tacky dough that cleans the sides of the bowl. Whole wheat flour absorbs more moisture than white flour, so be patient and adjust accordingly - you'll know it's right when the dough feels slightly tacky but not sticky." }, { "@type": "HowToStep", "name": "Knead Dough", "text": "Knead the dough for 8-10 minutes by hand on a lightly floured surface (or 5-6 minutes in a stand mixer). The dough should become smooth and elastic - when you press it gently with your finger, it should slowly spring back. This extended kneading develops the gluten structure necessary for proper pocket formation." }, { "@type": "HowToStep", "name": "First Rise", "text": "Shape the dough into a ball and place in a lightly oiled bowl, turning once to coat. Cover with a damp kitchen towel or plastic wrap and let rise in a warm, draft-free spot for 1-1.5 hours, or until doubled in size. The slow rise develops flavor and texture in your pitas." }, { "@type": "HowToStep", "name": "Divide Dough", "text": "Once risen, gently punch down the dough to release air bubbles and transfer to a lightly floured work surface. Divide the dough into 8 equal pieces (using a kitchen scale helps ensure uniformity). Shape each piece into a ball by tucking the edges underneath and rolling between your palms." }, { "@type": "HowToStep", "name": "Rest and Preheat", "text": "Cover the dough balls with a kitchen towel and let rest for 15 minutes. This relaxes the gluten and makes rolling much easier. Meanwhile, place your pizza stone or heavy baking sheet in the oven and preheat to 250°C (480°F). The stone needs to be scorching hot to create the steam necessary for pocket formation." }, { "@type": "HowToStep", "name": "Roll Pitas", "text": "Working with one ball at a time while keeping others covered, roll each into a circle about 18cm (7 inches) in diameter and 5mm (¼ inch) thick. Aim for even thickness throughout - thinner centers and thicker edges won't puff properly. Let the rolled pitas rest for 5 minutes before baking." }, { "@type": "HowToStep", "name": "Bake", "text": "Carefully place 2-3 pitas (depending on your stone/sheet size) directly onto the hot stone or baking sheet. Bake for 2-3 minutes until they puff dramatically and the tops begin to take on a light golden color. Don't be tempted to open the oven door during the first minute - the trapped heat creates the steam that forms the pocket!" }, { "@type": "HowToStep", "name": "Cool and Store", "text": "Remove pitas with tongs and wrap immediately in a clean kitchen towel to keep them soft and pliable as they cool. Continue with remaining dough. Allow pitas to cool completely before cutting open or storing. Enjoy your fresh whole wheat pitas with your favorite fillings, or alongside dips like hummus and baba ganoush." } ], "aggregateRating": { "@type": "AggregateRating", "ratingValue": "5", "ratingCount": "178" }, "review": [ { "@type": "Review", "author": "Amara Patel", "datePublished": "2024-06-05", "reviewBody": "Perfect pockets every time! I've struggled with getting pita bread to puff properly, but following this recipe exactly solved all my problems. The whole wheat gives them such a wonderful nutty flavor too.", "name": "Perfect Pockets", "reviewRating": { "@type": "Rating", "ratingValue": "5" } }, { "@type": "Review", "author": "Lars Johansson", "datePublished": "2024-06-07", "reviewBody": "My kids absolutely love these! We've turned our weekends into a family pita party where everyone gets to stuff their own with different fillings. Healthy, fun, and delicious!", "name": "Family Favorite", "reviewRating": { "@type": "Rating", "ratingValue": "5" } }, { "@type": "Review", "author": "Maria Gonzalez", "datePublished": "2024-06-10", "reviewBody": "These pitas are definitely better than bakery ones! The texture is amazing - soft inside with that perfect chewy exterior. I appreciate the detailed instructions about temperature and technique. Worth the effort!", "name": "Superior to Bakery Pitas", "reviewRating": { "@type": "Rating", "ratingValue": "5" } }, { "@type": "Review", "author": "Kenji Tanaka", "datePublished": "2024-06-15", "reviewBody": "I'm impressed with how well these freeze! I made a double batch, froze half, and they reheat beautifully in the toaster. The whole wheat flour makes them so much more satisfying than commercial pitas.", "name": "Great for Meal Prep", "reviewRating": { "@type": "Rating", "ratingValue": "5" } }, { "@type": "Review", "author": "Elena Popescu", "datePublished": "2024-06-18", "reviewBody": "The combination of whole wheat and white flour creates the perfect balance. These have become my go-to lunch option - I fill them with hummus and veggies for a quick, healthy meal. Thank you for sharing this amazing recipe!", "name": "Healthy Lunch Solution", "reviewRating": { "@type": "Rating", "ratingValue": "5" } } ] }
{ "@context": "https://schema.org", "@type": "FAQPage", "mainEntity": [ { "@type": "Question", "name": "What ingredients are used in Whole Wheat Pita Bread Recipe?", "acceptedAnswer": { "@type": "Answer", "text": "Whole wheat pita bread requires whole wheat flour, all-purpose flour, active dry yeast, honey, salt, olive oil, and warm water. This combination creates a nutty-flavoured bread with perfect pockets while maintaining a soft, chewy texture." } }, { "@type": "Question", "name": "How to cook Whole Wheat Pita Bread Recipe at home?", "acceptedAnswer": { "@type": "Answer", "text": "Learn how to cook Whole Wheat Pita Bread by first activating yeast with honey and warm water, combining with flours, salt and olive oil, then kneading thoroughly. After rising, divide into portions, roll into discs, and bake on a scorching hot pizza stone or baking sheet at 250°C for 2-3 minutes until they dramatically puff up, creating perfect pockets." } }, { "@type": "Question", "name": "Why won't my flatbreads puff up properly to form pockets?", "acceptedAnswer": { "@type": "Answer", "text": "Several factors affect pita puffing: insufficient kneading (gluten development), uneven thickness when rolling, oven not hot enough, or opening the oven too early. Ensure your oven preheats thoroughly with the stone/sheet inside, roll evenly to 5mm thickness, and avoid peeking during the first minute of baking." } }, { "@type": "Question", "name": "Can I make these pita breads entirely with whole wheat flour?", "acceptedAnswer": { "@type": "Answer", "text": "Yes, you can use 100% whole wheat flour, but expect a denser texture and slightly less dramatic puffing. Increase water by about 25ml as whole wheat absorbs more moisture, and consider extending kneading time to develop adequate gluten structure for pocket formation." } }, { "@type": "Question", "name": "How should I store homemade pita bread and how long does it keep?", "acceptedAnswer": { "@type": "Answer", "text": "Store cooled pitas in an airtight container or ziplock bag at room temperature for 2-3 days. For longer storage, freeze in a single layer, then transfer to a freezer bag for up to 3 months. Refresh before eating by sprinkling with water and warming in a 180°C oven for 3-4 minutes." } } ] }