Gluten-Free Croissants Recipe
Learn how to make the best homemade gluten-free croissants with this foolproof recipe. Using a specialized flour blend and proper lamination techniques, these buttery, flaky pastries rival traditional versions. Perfect for weekend baking projects when you crave authentic French patisserie without gluten!
Difficulty:
Advanced
Prep Time:
1 hour 30 mins
Cook Time:
25 mins
Serves:
12 croissants
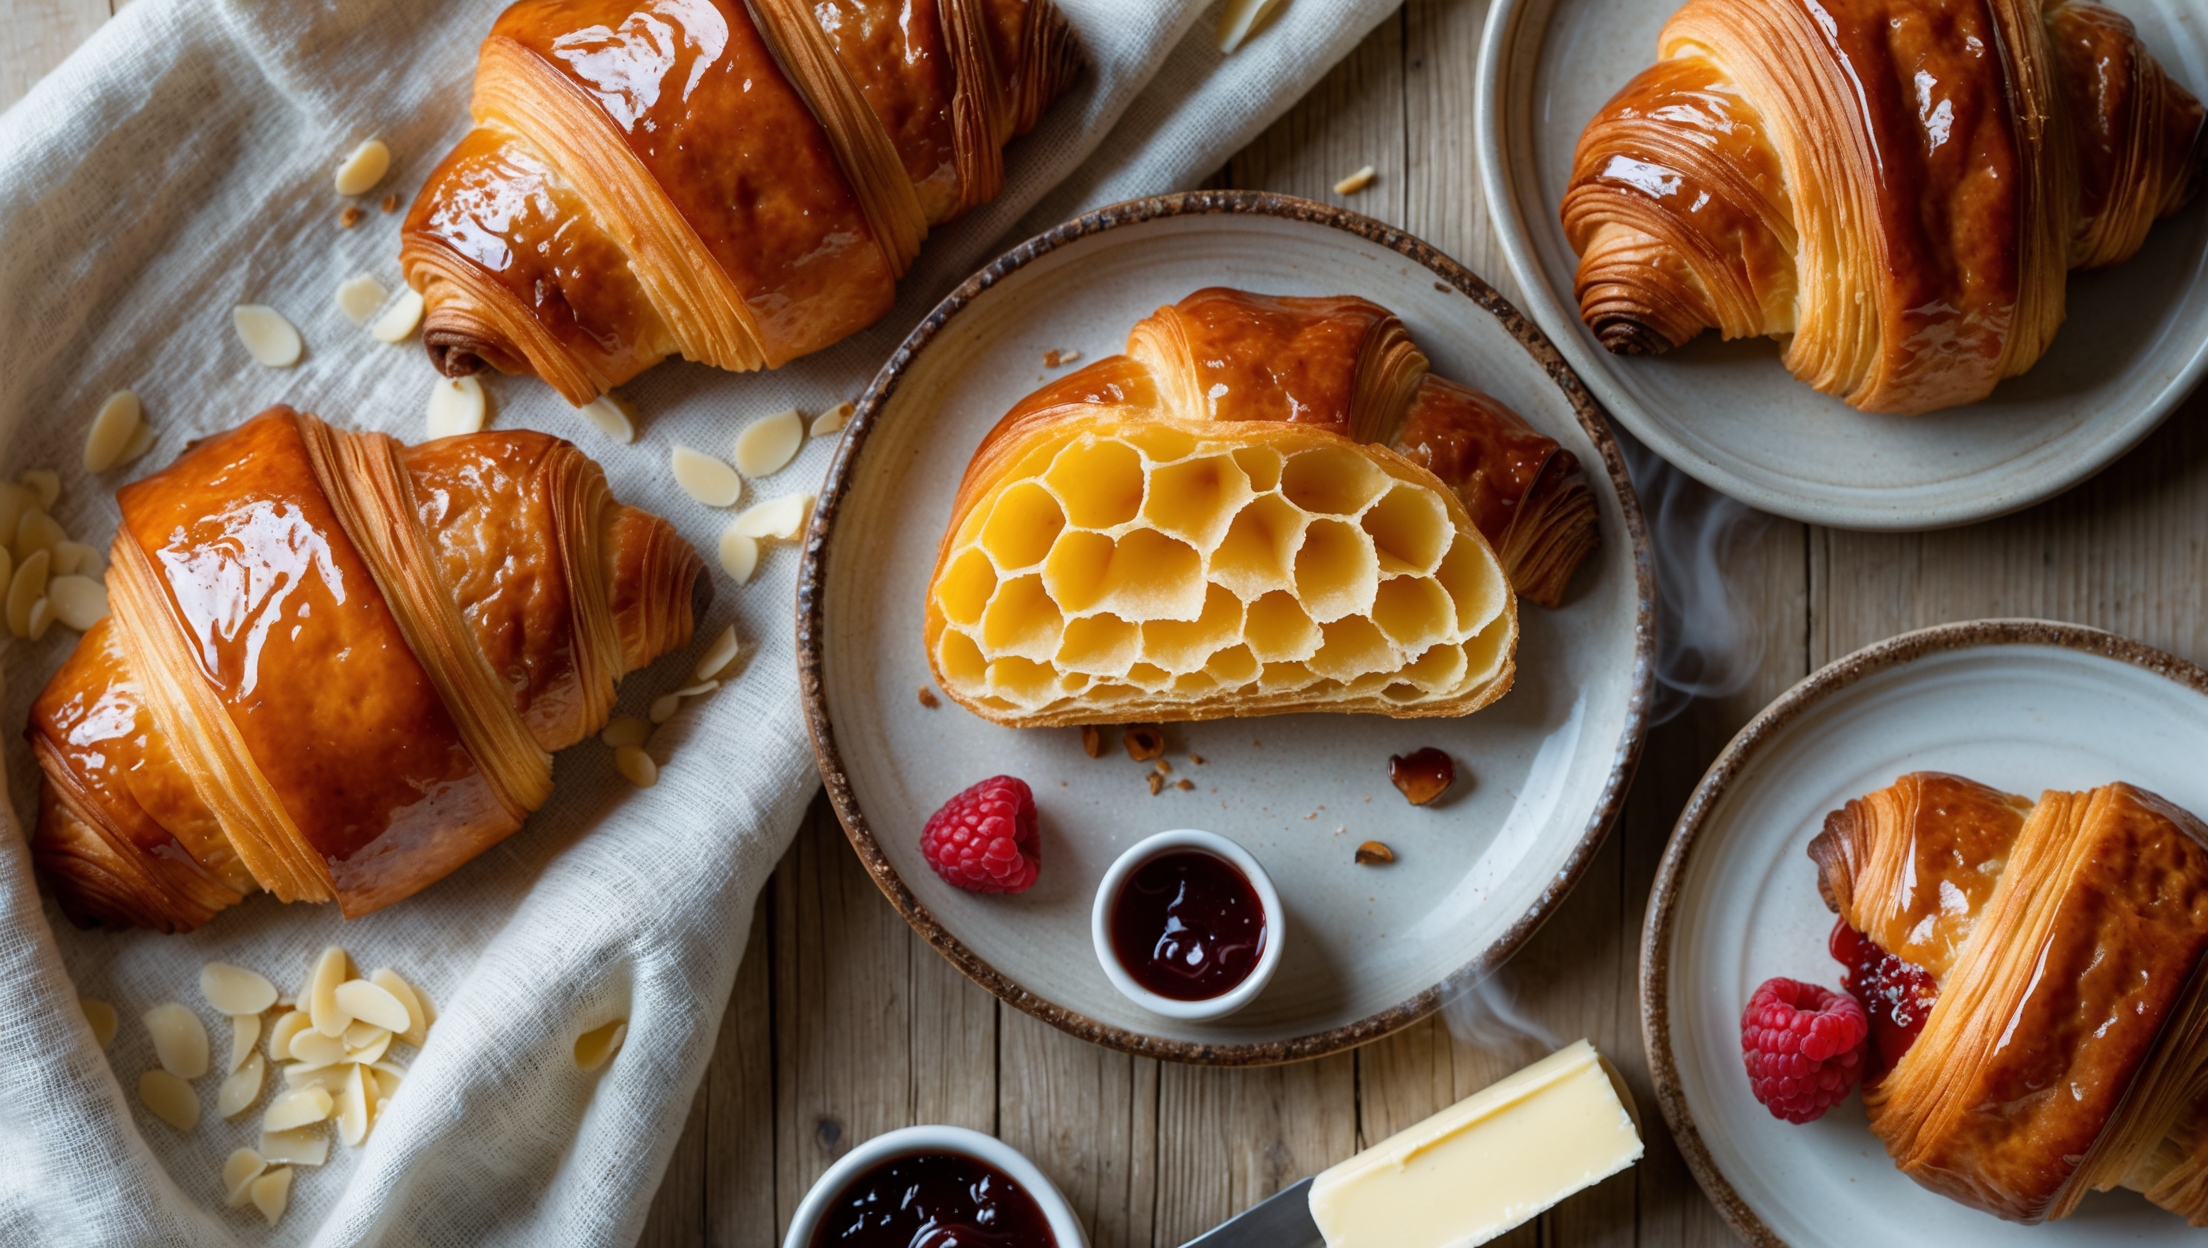
Overhead shot of golden-brown gluten-free croissants arranged on a rustic linen cloth with scattered almond flour. A dramatic cross-section of one croissant reveals delicate honeycomb layers inside the flaky pastry. Soft morning light streams in from the side, highlighting the glossy egg-washed exterior and crystalline sugar particles. A vintage ceramic plate holds a partially eaten croissant next to a small pot of raspberry jam and a butter knife with a curl of cultured butter. Steam wisps rise from a freshly-cut croissant, suggesting warmth and freshness. The neutral tones of the wooden table contrast with the rich amber pastries, emphasizing their perfect caramelization and crisp exterior.

Ingredients

<ul class="ingredients-main-list"><li class="ingredients-single-item">180g rice flour</li><li class="ingredients-single-item">90g tapioca starch</li><li class="ingredients-single-item">60g potato starch</li><li class="ingredients-single-item">40g almond flour</li><li class="ingredients-single-item">20g psyllium husk powder</li><li class="ingredients-single-item">12g xanthan gum</li><li class="ingredients-single-item">10g fine sea salt</li><li class="ingredients-single-item">25g granulated sugar</li><li class="ingredients-single-item">7g instant yeast</li><li class="ingredients-single-item">240ml whole milk, lukewarm</li><li class="ingredients-single-item">2 large eggs (1 for dough, 1 for egg wash)</li><li class="ingredients-single-item">30g unsalted butter, melted</li><li class="ingredients-single-item">225g cold unsalted European-style butter (for lamination)</li><li class="ingredients-single-item">15ml apple cider vinegar</li></ul>

Equipment

<ul class="equipment-main-list"><li class="equipment-single-item">Stand mixer with paddle attachment</li><li class="equipment-single-item">Rolling pin</li><li class="equipment-single-item">Bench scraper</li><li class="equipment-single-item">Pastry brush</li><li class="equipment-single-item">Digital kitchen thermometer</li><li class="equipment-single-item">Ruler or measuring tape</li><li class="equipment-single-item">Parchment paper</li></ul>

Directions

<ol class="no-list-style"><li class="MethodStepper"><h4 class="step-title">Step 1</h4>In a large bowl, whisk together the rice flour, tapioca starch, potato starch, almond flour, psyllium husk powder, xanthan gum, salt, and sugar. These ingredients work together to create structure and elasticity that mimics gluten. The psyllium husk is particularly important as it helps develop the stretchy texture we need for lamination.</li><li class="MethodStepper"><h4 class="step-title">Step 2</h4>In a small bowl, combine the lukewarm milk (about 38°C) with the instant yeast and let it sit for 5 minutes until foamy. The milk should be warm enough to activate the yeast but not hot enough to kill it.</li><li class="MethodStepper"><h4 class="step-title">Step 3</h4>Add the milk-yeast mixture, one beaten egg, melted butter, and apple cider vinegar to your dry ingredients. The vinegar helps tenderize the dough and enhances the action of the leavening agents.</li><li class="MethodStepper"><h4 class="step-title">Step 4</h4>Using the paddle attachment of your stand mixer, mix on low speed until combined, then increase to medium speed and beat for 3-4 minutes until you have a cohesive, slightly sticky dough. Gluten-free dough behaves differently than wheat dough - it won't be as elastic but should be smooth and somewhat moldable.</li><li class="MethodStepper"><h4 class="step-title">Step 5</h4>Turn the dough onto a surface lightly dusted with rice flour, shape into a rectangle about 1.5cm thick, wrap tightly in plastic wrap, and refrigerate for at least 2 hours or preferably overnight. This resting period allows the psyllium husk and xanthan gum to fully hydrate, improving the dough's structure.</li><li class="MethodStepper"><h4 class="step-title">Step 6</h4>Prepare your butter block for lamination. Place the cold European-style butter (it has a higher fat content which creates better layers) between two pieces of parchment paper and pound it with a rolling pin until it becomes malleable but still cold. Shape it into a 15cm×15cm square, then refrigerate until firm but pliable, about 10-15 minutes.</li><li class="MethodStepper"><h4 class="step-title">Step 7</h4>On a lightly floured surface, roll the chilled dough into a 25cm×25cm square. Place the butter block in the center at a 45-degree angle (like a diamond on a square). Fold the corners of the dough over the butter to enclose it completely, pinching the seams to seal.</li><li class="MethodStepper"><h4 class="step-title">Step 8</h4>Roll the dough into a rectangle approximately 45cm×20cm, working quickly to keep the butter cold. Fold the dough in thirds like a letter (this is your first "turn"). Wrap in plastic and refrigerate for 30 minutes. The cold relaxes the dough and keeps the butter from melting into the layers.</li><li class="MethodStepper"><h4 class="step-title">Step 9</h4>Repeat the rolling and folding process for a total of three turns, always refrigerating for 30 minutes between turns. By the final turn, you should notice the dough becoming more elastic and showing visible layers. These layers are what will create the signature flaky texture of croissants.</li><li class="MethodStepper"><h4 class="step-title">Step 10</h4>After the final turn, refrigerate the dough for at least 1 hour or overnight. When ready to shape, roll the dough on a lightly floured surface to a 50cm×30cm rectangle with a thickness of about 4mm. Trim the edges straight to expose the layers and create a clean rectangle.</li><li class="MethodStepper"><h4 class="step-title">Step 11</h4>Cut the dough into triangles with a 10cm base and 20cm height. Make a small 1cm incision in the center of the base of each triangle – this helps the croissant curve more easily when rolled. Gently stretch each triangle to about 25cm long, being careful not to break the dough.</li><li class="MethodStepper"><h4 class="step-title">Step 12</h4>Roll each triangle from the base to the tip, keeping the tip centered and gently stretching the dough as you roll. Place the shaped croissants on parchment-lined baking sheets with the tip tucked underneath, curving the ends slightly inward to create the classic crescent shape.</li><li class="MethodStepper"><h4 class="step-title">Step 13</h4>Cover the croissants loosely with plastic wrap and let them proof at room temperature (about 23°C) until noticeably puffy and nearly doubled in size, approximately 2 hours. They won't rise as dramatically as wheat croissants, but should feel light and airy when gently touched.</li><li class="MethodStepper"><h4 class="step-title">Step 14</h4>Preheat your oven to 190°C with a rack in the middle position. Beat the remaining egg with 1 tablespoon of water and gently brush this egg wash over the proofed croissants, being careful not to deflate them.</li><li class="MethodStepper"><h4 class="step-title">Step 15</h4>Bake for 20-25 minutes until deeply golden brown. Don't be tempted to remove them too early – proper browning ensures they're fully baked inside. The internal temperature should reach about 99°C when measured with a digital thermometer.</li><li class="MethodStepper"><h4 class="step-title">Step 16</h4>Transfer to a wire rack to cool for at least 20 minutes before serving. Gluten-free croissants are best enjoyed the day they're baked, but you can store cooled croissants in an airtight container for up to 2 days and refresh in a 175°C oven for 5 minutes before serving.</li></ol>

FAQs

Find answers to your most pressing questions about this delicious recipe right here.

What ingredients are used in Gluten-Free Croissants Recipe?

Gluten-free croissants require a specialized flour blend of rice flour, tapioca starch, potato starch, almond flour, with psyllium husk and xanthan gum for structure. European-style butter, milk, eggs, yeast, and apple cider vinegar complete the ingredient list.

How to cook Gluten-Free Croissants Recipe at home?

Learn how to cook Gluten-Free Croissants by creating a specialized dough, laminating it with butter through three folding sequences, shaping into triangles, and baking until golden brown. The process involves precise temperature control and resting periods to achieve those authentic flaky layers without gluten.

Why is psyllium husk powder essential for laminated pastry?

Psyllium husk powder mimics gluten's elasticity in gluten-free doughs, creating the necessary structure and stretchiness for proper lamination. It absorbs moisture, forms a gel-like consistency, and allows the dough to stretch without tearing when folded around butter.

Can I freeze unbaked croissant dough for later use?

Yes! Shape your croissants, place them on a baking sheet, freeze until solid, then transfer to freezer bags for up to 1 month. When ready to bake, thaw overnight in the refrigerator, then proof at room temperature until puffy before baking.

Why does European-style butter make a difference in flaky pastries?

European-style butter contains higher butterfat (82-84% vs. 80% in regular butter) and less water, creating more distinct, crisp layers during baking. It remains solid at higher temperatures, allowing for proper lamination without melting into the dough prematurely.

Want to try something else in ...

Gluten-Free Desserts

Try following recommended recipes
{ "@context": "http://schema.org/", "@type": "Recipe", "name": "Gluten-Free Croissants Recipe", "author": { "@type": "Person", "name": "Gurbir Aujla", "brand": "What's Baking?", "jobTitle": "Baker" }, "datePublished": "2024-04-27", "description": "Learn how to make the best homemade gluten-free croissants with this foolproof recipe. Using a specialized flour blend and proper lamination techniques, these buttery, flaky pastries rival traditional versions. Perfect for weekend baking projects when you crave authentic French patisserie without gluten!", "prepTime": "PT1H30M", "cookTime": "PT25M", "totalTime": "PT4H25M", "keywords": "gluten-free croissants, laminated pastry, celiac-friendly, French pastry, flaky breakfast", "recipeYield": "12", "recipeCategory": "Breakfast", "recipeCuisine": "French", "nutrition": { "@type": "NutritionInformation", "calories": "290 calories", "carbohydrateContent": "28 g", "proteinContent": "3 g", "fatContent": "18 g", "saturatedFatContent": "11 g", "cholesterolContent": "75 mg", "sodiumContent": "180 mg", "sugarContent": "3 g", "servingSize": "1 serving" }, "recipeIngredient": [ "180g rice flour", "90g tapioca starch", "60g potato starch", "40g almond flour", "20g psyllium husk powder", "12g xanthan gum", "10g fine sea salt", "25g granulated sugar", "7g instant yeast", "240ml whole milk, lukewarm", "2 large eggs (1 for dough, 1 for egg wash)", "30g unsalted butter, melted", "225g cold unsalted European-style butter (for lamination)", "15ml apple cider vinegar" ], "recipeInstructions": [ { "@type": "HowToStep", "name": "Prepare Dry Ingredients", "text": "In a large bowl, whisk together the rice flour, tapioca starch, potato starch, almond flour, psyllium husk powder, xanthan gum, salt, and sugar. These ingredients work together to create structure and elasticity that mimics gluten. The psyllium husk is particularly important as it helps develop the stretchy texture we need for lamination." }, { "@type": "HowToStep", "name": "Activate Yeast", "text": "In a small bowl, combine the lukewarm milk (about 38°C) with the instant yeast and let it sit for 5 minutes until foamy. The milk should be warm enough to activate the yeast but not hot enough to kill it." }, { "@type": "HowToStep", "name": "Combine Wet Ingredients", "text": "Add the milk-yeast mixture, one beaten egg, melted butter, and apple cider vinegar to your dry ingredients. The vinegar helps tenderize the dough and enhances the action of the leavening agents." }, { "@type": "HowToStep", "name": "Mix Dough", "text": "Using the paddle attachment of your stand mixer, mix on low speed until combined, then increase to medium speed and beat for 3-4 minutes until you have a cohesive, slightly sticky dough. Gluten-free dough behaves differently than wheat dough - it won't be as elastic but should be smooth and somewhat moldable." }, { "@type": "HowToStep", "name": "Initial Rest", "text": "Turn the dough onto a surface lightly dusted with rice flour, shape into a rectangle about 1.5cm thick, wrap tightly in plastic wrap, and refrigerate for at least 2 hours or preferably overnight. This resting period allows the psyllium husk and xanthan gum to fully hydrate, improving the dough's structure." }, { "@type": "HowToStep", "name": "Prepare Butter Block", "text": "Prepare your butter block for lamination. Place the cold European-style butter (it has a higher fat content which creates better layers) between two pieces of parchment paper and pound it with a rolling pin until it becomes malleable but still cold. Shape it into a 15cm×15cm square, then refrigerate until firm but pliable, about 10-15 minutes." }, { "@type": "HowToStep", "name": "Enclose Butter", "text": "On a lightly floured surface, roll the chilled dough into a 25cm×25cm square. Place the butter block in the center at a 45-degree angle (like a diamond on a square). Fold the corners of the dough over the butter to enclose it completely, pinching the seams to seal." }, { "@type": "HowToStep", "name": "First Turn", "text": "Roll the dough into a rectangle approximately 45cm×20cm, working quickly to keep the butter cold. Fold the dough in thirds like a letter (this is your first 'turn'). Wrap in plastic and refrigerate for 30 minutes. The cold relaxes the dough and keeps the butter from melting into the layers." }, { "@type": "HowToStep", "name": "Complete Lamination", "text": "Repeat the rolling and folding process for a total of three turns, always refrigerating for 30 minutes between turns. By the final turn, you should notice the dough becoming more elastic and showing visible layers. These layers are what will create the signature flaky texture of croissants." }, { "@type": "HowToStep", "name": "Final Rest", "text": "After the final turn, refrigerate the dough for at least 1 hour or overnight. When ready to shape, roll the dough on a lightly floured surface to a 50cm×30cm rectangle with a thickness of about 4mm. Trim the edges straight to expose the layers and create a clean rectangle." }, { "@type": "HowToStep", "name": "Cut And Shape", "text": "Cut the dough into triangles with a 10cm base and 20cm height. Make a small 1cm incision in the center of the base of each triangle – this helps the croissant curve more easily when rolled. Gently stretch each triangle to about 25cm long, being careful not to break the dough." }, { "@type": "HowToStep", "name": "Roll Croissants", "text": "Roll each triangle from the base to the tip, keeping the tip centered and gently stretching the dough as you roll. Place the shaped croissants on parchment-lined baking sheets with the tip tucked underneath, curving the ends slightly inward to create the classic crescent shape." }, { "@type": "HowToStep", "name": "Proof", "text": "Cover the croissants loosely with plastic wrap and let them proof at room temperature (about 23°C) until noticeably puffy and nearly doubled in size, approximately 2 hours. They won't rise as dramatically as wheat croissants, but should feel light and airy when gently touched." }, { "@type": "HowToStep", "name": "Prepare For Baking", "text": "Preheat your oven to 190°C with a rack in the middle position. Beat the remaining egg with 1 tablespoon of water and gently brush this egg wash over the proofed croissants, being careful not to deflate them." }, { "@type": "HowToStep", "name": "Bake", "text": "Bake for 20-25 minutes until deeply golden brown. Don't be tempted to remove them too early – proper browning ensures they're fully baked inside. The internal temperature should reach about 99°C when measured with a digital thermometer." }, { "@type": "HowToStep", "name": "Cool And Serve", "text": "Transfer to a wire rack to cool for at least 20 minutes before serving. Gluten-free croissants are best enjoyed the day they're baked, but you can store cooled croissants in an airtight container for up to 2 days and refresh in a 175°C oven for 5 minutes before serving." } ], "aggregateRating": { "@type": "AggregateRating", "ratingValue": "5", "ratingCount": "152" }, "review": [ { "@type": "Review", "author": "Isabelle Laurent", "datePublished": "2024-04-20", "reviewBody": "Perfect layers and absolutely worth the effort! As someone with celiac disease, I never thought I'd taste a proper croissant again, but these are exceptional. The detailed instructions made the complicated process manageable.", "name": "Exceptional Gluten-Free Pastry", "reviewRating": { "@type": "Rating", "ratingValue": "5" } }, { "@type": "Review", "author": "Akira Tanaka", "datePublished": "2024-04-15", "reviewBody": "Finally found gluten-free perfection! The texture is remarkably close to traditional croissants. I've tried many recipes over the years and this is the only one that delivers that authentic flaky, buttery experience.", "name": "Best GF Croissants Ever", "reviewRating": { "@type": "Rating", "ratingValue": "5" } }, { "@type": "Review", "author": "Elena Rodrigues", "datePublished": "2024-04-18", "reviewBody": "These are truly indistinguishable from wheat versions! My non-celiac family members couldn't tell the difference. The psyllium husk really works magic in developing that perfect texture. Will definitely be making these regularly.", "name": "Fooled the Wheat Eaters!", "reviewRating": { "@type": "Rating", "ratingValue": "5" } }, { "@type": "Review", "author": "Lars Andersen", "datePublished": "2024-04-23", "reviewBody": "Buttery heaven on a plate! Although the recipe is technically challenging, the results are extraordinary. The detailed steps and explanations helped me achieve perfect lamination, something I never thought possible with gluten-free flour.", "name": "Technical But Worth It", "reviewRating": { "@type": "Rating", "ratingValue": "5" } }, { "@type": "Review", "author": "Priya Sharma", "datePublished": "2024-04-12", "reviewBody": "Better than bakery versions! I make these weekly now and freeze the extras. The dough handles surprisingly well for being gluten-free, and the flavor is exceptional. The crisp exterior and tender honeycomb interior are perfection.", "name": "Regular in My Baking Rotation", "reviewRating": { "@type": "Rating", "ratingValue": "5" } } ] }
{ "@context": "https://schema.org", "@type": "FAQPage", "mainEntity": [ { "@type": "Question", "name": "What ingredients are used in Gluten-Free Croissants Recipe?", "acceptedAnswer": { "@type": "Answer", "text": "Gluten-free croissants require a specialized flour blend of rice flour, tapioca starch, potato starch, almond flour, with psyllium husk and xanthan gum for structure. European-style butter, milk, eggs, yeast, and apple cider vinegar complete the ingredient list." } }, { "@type": "Question", "name": "How to cook Gluten-Free Croissants Recipe at home?", "acceptedAnswer": { "@type": "Answer", "text": "Learn how to cook Gluten-Free Croissants by creating a specialized dough, laminating it with butter through three folding sequences, shaping into triangles, and baking until golden brown. The process involves precise temperature control and resting periods to achieve those authentic flaky layers without gluten." } }, { "@type": "Question", "name": "Why is psyllium husk powder essential for laminated pastry?", "acceptedAnswer": { "@type": "Answer", "text": "Psyllium husk powder mimics gluten's elasticity in gluten-free doughs, creating the necessary structure and stretchiness for proper lamination. It absorbs moisture, forms a gel-like consistency, and allows the dough to stretch without tearing when folded around butter." } }, { "@type": "Question", "name": "Can I freeze unbaked croissant dough for later use?", "acceptedAnswer": { "@type": "Answer", "text": "Yes! Shape your croissants, place them on a baking sheet, freeze until solid, then transfer to freezer bags for up to 1 month. When ready to bake, thaw overnight in the refrigerator, then proof at room temperature until puffy before baking." } }, { "@type": "Question", "name": "Why does European-style butter make a difference in flaky pastries?", "acceptedAnswer": { "@type": "Answer", "text": "European-style butter contains higher butterfat (82-84% vs. 80% in regular butter) and less water, creating more distinct, crisp layers during baking. It remains solid at higher temperatures, allowing for proper lamination without melting into the dough prematurely." } } ] }