On this page
You can make a beautiful pie filling and still end up with a disappointing slice if the crust underneath is pale or damp. That is where blind baking pie crust comes in. It gives the pastry time to set and crisp before a moist filling goes into the shell—or before a filling that will not be baked at all is added.
The method sounds technical, but the idea is simple: blind baking means baking a pastry shell without its filling. The important question is how far to bake it. A pumpkin-style custard may need a partially baked shell, while a chocolate cream pie needs a fully baked one. Follow the filling recipe first; use this guide to understand the process and avoid the most common problems.
What is blind baking?
Blind baking, sometimes called prebaking, is baking an empty pie crust or tart shell before you add the filling. During the first stage, parchment and weights hold the dough against the bottom and sides of the pan so it does not balloon up or slide down as the fat melts.
After that weighted bake, you remove the liner and weights. A short additional bake may be enough for a partially baked shell; a longer second bake develops the dry, golden base needed for a no-bake filling.
The key distinction: partially baked pastry will finish in the oven with its filling. Fully baked pastry should be properly cooked and golden before a filling that will not return to the oven is added.
When should you blind bake a pie crust?
| Type of filling | How to treat the crust | Why it helps |
|---|---|---|
| Chocolate cream, banana cream, chilled pudding or a cooked-and-cooled filling | Fully blind bake | The filling will not bake a raw crust after assembly. |
| Some pumpkin, sweet potato, quiche or custard pies | Partially blind bake if the recipe directs | A head start helps the pastry set beneath a moist filling. |
| Many double-crust fruit pies | Usually not a separate step | Their recipes are designed to bake fruit and pastry together. |
| A tart filled with already-cooked ganache or another chilled filling | Usually fully bake | The shell needs to be done before filling. |
For a real-world example, look at the pastry instructions in our Chocolate Tart Recipe, which uses a prebaked tart shell before the chocolate filling is added. Other recipes, such as our Eggnog Custard Tart or Raspberry White Chocolate Tart, may handle their fillings differently; always use the method written for that particular dessert.
What you need to blind bake pie crust
You do not need specialized equipment, though a few small choices make this easier:
- One chilled pastry-lined pie or tart pan. Use the pan specified in your recipe; metal, glass and ceramic transfer heat differently.
- Oven-safe parchment paper or foil. It should be large enough to line the base and climb up the sides without tearing.
- Enough pie weights to support the crust. Ceramic weights, uncooked dry rice or dried beans can work. A few weights in the center will not hold tall pastry sides in place.
- A rimmed baking sheet. It makes it easier to transfer the pie plate safely.
- A fork and oven mitts. The fork helps release a bubble after the weights come out; the weights themselves will be very hot.
You can reuse dried beans or rice as baking weights, but keep them separately labelled for baking rather than assuming they will cook normally afterward.
How to blind bake pie crust, step by step
Step 1: Fit the dough into the pan without stretching it
Roll the chilled pastry to the thickness recommended by your dough recipe. Lay it over the pan, lower it gently into the corners and press it into place. Do not pull the dough tight to make it fit: stretched pastry tends to retract as it bakes, leaving a short, shrunken edge.
Trim or crimp the overhang as directed. If the dough becomes soft while you work, return the lined pan to the refrigerator before the next step.
Step 2: Chill the shaped shell
Refrigerate the assembled crust for about 30 minutes, or follow your pastry recipe's chilling instructions. This lets the dough relax and firms the butter or other fat so the crust can hold its shape longer when it hits the oven.
A well-chilled shell is especially important for an all-butter dough with decorative crimps. Skipping this step is one of the easiest ways to end up with slumped sides.
Step 3: Line with parchment and add plenty of weights
Gently press parchment into the chilled shell, making sure it reaches the corners. Pour in enough pie weights to cover the base and support the sides—generally about two-thirds full or more, depending on the depth of your pan and the recipe.
The weights have two jobs: they discourage the center from puffing and keep the sides from slipping inward. You should still be able to gather the parchment securely to remove the weights later.

Step 4: Bake until the sides have set
Place the pan on a baking sheet in a fully preheated oven. Your pastry recipe's temperature takes priority. As a reference point, a commonly used method bakes a weighted standard pie crust at 375°F (190°C) for around 20 minutes before the weights come out. The time is an example, not a guarantee for every tart pan, crust thickness or dough formula.
Look for pastry that is beginning to set along the sides rather than raw, floppy dough. If the edge browns too quickly later, protect it with a suitable pie shield or foil.
Step 5: Lift out the weights, then finish baking
Use oven mitts and carefully lift the parchment with the hot weights onto a heat-safe surface. If the bottom bubbles or rises, prick only the raised areas gently with a fork. Return the uncovered shell to the oven.
- For a partially prebaked shell: stop at the stage the filling recipe specifies, typically once the bottom looks set and no longer doughy. The filling and crust will bake together afterward.
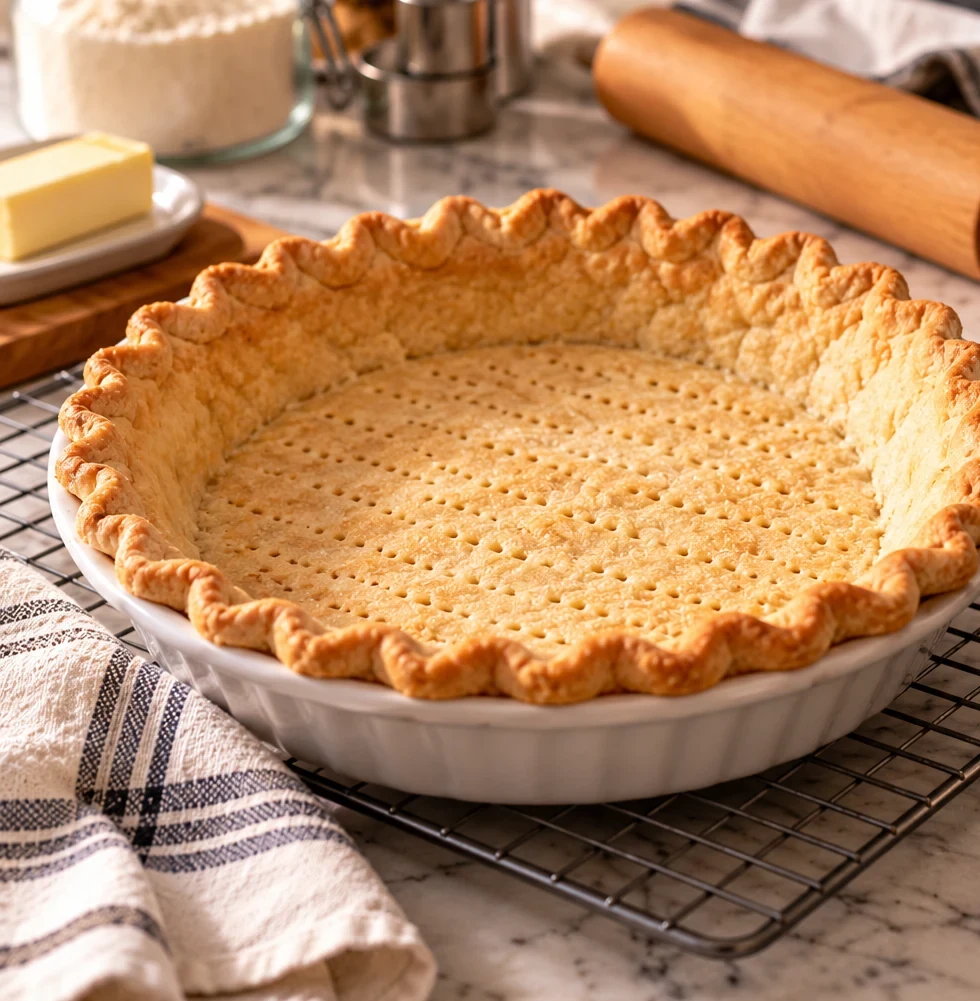
- For a fully prebaked shell: continue until the entire base is dry and evenly golden, not just the rim. In some standard methods this second stage takes another 15–25 minutes, but visual doneness and the recipe matter more than a universal timer.
A pale, damp-looking base is not ready for a chilled cream filling even if the crimp is already brown.
Step 6: Cool before adding a cold filling
If you are using a chilled pudding, pastry cream or set ganache filling, let the baked crust cool as your recipe directs. Pouring a cold-set filling into a hot shell can change its texture or soften components you wanted to keep firm.
For a filling that returns to the oven, follow the recipe's instructions about whether the partially baked shell should be warm or cooled first.
Partially baked versus fully baked: what should you see?
A partially baked crust has its structure set, especially around the sides, but the bottom may be pale because it will receive more oven time after filling. It should not resemble wet raw dough.
A fully baked crust has a distinctly dry base and even golden color. Lift it slightly only if your pan and recipe permit; otherwise inspect the interior and bottom through a glass plate if you have one. The important test is whether the pastry itself looks cooked, not whether the edge alone has browned.
If your filling is already cooked and only needs to chill, it cannot fix an underbaked crust later.
Why did my pie crust shrink or puff up?
My crust slid down the sides
The pastry may have been stretched into the pan, insufficiently chilled or weighted only in the middle. Next time, leave the dough relaxed, chill the entire shaped shell and use enough weights to brace the side walls. Very buttery dough can be particularly prone to sliding as its fat melts.
My crust puffed into a dome
Air or steam expanded under the base. Properly distributed weights help during the first bake. After removing them, gently dock any rising patches and finish baking. Simply pricking an unweighted raw shell is not as reliable as weighting a tall shell.
My crust looks golden around the rim but pale underneath
The bottom often needs more time after the parchment and weights come out. The liner shields that surface from direct heat. Continue the second bake as directed, protecting the edge if necessary. Do not mistake an attractive golden crimp for a fully cooked shell.
My filling made the crust soggy
First confirm whether the shell was fully baked when it needed to be. Then consider whether it was filled before cooling, whether the filling was unusually wet, and how long the assembled dessert sat before serving. Some recipes use a moisture barrier, but follow the particular pie recipe rather than adding an untested glaze that could alter flavor or texture.
Can I blind bake without ceramic pie weights?
Yes. Uncooked dried beans or rice can act as weights when placed on top of parchment. Granulated sugar is another technique used by some bakers. Choose a liner that is strong enough to remove the heated contents safely and fill the shell adequately to protect the sides.
Can you use only a fork instead? Docking helps prevent bubbles, but it does not provide the pressure on the side walls that weights do. For a decorative, tall-edged shell, weights are generally the more reliable approach.
Can I blind bake a pie crust ahead of time?
Often you can, particularly when the finished filling will be added later. Let the shell cool completely and store it protected from humidity and breakage according to the dough recipe. Avoid sealing a hot crust: trapped steam can soften the pastry.
Once you add a dairy-, egg- or cream-based filling, follow the assembled dessert's refrigeration and food-safety instructions. Making an empty shell in advance is not the same as leaving a filled custard pie at room temperature.
Frequently asked questions
Do I have to blind bake an apple pie crust?
Not usually for a classic double-crust apple pie. Many apple-pie recipes are formulated to bake the filling and unbaked pastry together. Follow the method in your selected recipe rather than applying a cream-pie technique to every fruit pie.
Do you bake pie crust before adding pumpkin filling?
Sometimes. Some pumpkin-pie methods recommend a partial prebake to improve the bottom crust, while others use a raw shell. Use the method and temperature specified by your pumpkin-pie recipe because its timing and filling quantity are designed together.
How do I know when to remove the pie weights?
Remove them when the sides have set enough to stand without support, as indicated by the recipe's weighted-baking stage. The surface beneath the weights may still look pale; that is expected before the uncovered stage.
Can I reuse the beans or rice used as pie weights?
Yes, set them aside after they cool and reuse them as dedicated pie weights. They may no longer cook well for eating, so keep them in a clearly marked container.
Do I need to prick the crust before blind baking?
Some methods dock before the weighted bake, while others wait until the parchment and weights are removed. The safest approach is to follow your dough recipe. If you notice a bubble once weights are removed, carefully prick that area to release steam.
What partially baked and fully baked shells look like
A partially baked pie shell receives further baking after filling. Its sides should be set and the base should have had a head start against sogginess, but it need not be as deeply golden as a shell intended to hold a filling that will never return to the oven. A fully baked shell should look dry and properly cooked, including its bottom; pale, oily-looking pastry beneath a set rim often needs more baking according to the source recipe.
Our Chocolate Tart uses a pastry shell for a chocolate-and-cream filling. The Raspberry White Chocolate Tart also includes a cream-and-chocolate filling, plus fresh raspberries. Each is a good reason to read the shell's own steps rather than applying a single timed blind-bake to every tart. The Eggnog Custard Tart involves a baked egg custard and therefore a different later heat exposure.
How to stop pastry shrinking
Do not pull and stretch dough tightly into the tin; it tends to pull back as it bakes. Press it gently into the corners and allow adequate overhang or trimming according to the recipe. Chill the shaped pastry so fat is firm before entering the oven. Line carefully with parchment and enough baking weights to support the walls, not just a small pile in the centre.
A metal or ceramic pan can conduct heat differently, so watch the intended visual cues. If the rim browns long before the base dries, check the oven position and whether the weights were removed at the correct stage. An underbaked base can absorb moisture from filling despite a beautifully fluted edge.
How to handle weights safely
Use dedicated ceramic pie weights or dry rice or beans where the recipe permits, and keep the weights in an appropriate container after they cool. Hot weights and their parchment liner can cause burns. Lift carefully using the paper's edges and a safe work surface, without spilling hot rice into the open oven or tearing delicate pastry.
Once the liner is removed, return the crust to bake for the appropriate finishing stage. A bubbling base can sometimes be gently pricked if the source recipe recommends docking. Do not pierce the crust indiscriminately when a very liquid filling will later be added, because holes may encourage leakage.
Blind-baking troubleshooting questions
Why did the sides slump?
The dough may have been stretched, insufficiently chilled or inadequately supported by weights. Follow the shaping and cooling sequence from the pastry recipe and check whether the weights reach the sides.
Why did the bottom stay soft?
It may need further unweighted baking, a suitable pan or more time for excess moisture to escape. The rim's colour alone does not prove the bottom is done.
Can I prepare several tart shells ahead?
Many recipes allow suitable make-ahead shells, but protect fragile crusts and follow the recipe's storage instructions. Fill with cream, custard or fresh fruit only within the conditions appropriate for those ingredients.
Understand the pastry before putting it in the oven
A good blind-baked shell starts with dough that has been prepared and rested according to its recipe. Cold fat, appropriate hydration and minimal stretching are useful for pastry that needs to hold an edge. When fitting the dough into a pan, ease it into the corners rather than pulling it taut. A stretched shell is more likely to retreat from the rim during baking. If the crust requires chilling before the weighted bake, build that time into the schedule.
The shape and material of the pan also affect results. A shallow tart tin and a deep pie plate do not necessarily bake the same way; a metal pan can conduct heat differently from a thick ceramic one. Use the author's stated dish size when possible and watch the bottom as well as the rim. Pastry that looks golden above may remain pale and damp below if the weights are removed too late or the oven heat has not reached the base effectively.
How to fit parchment and pie weights properly
Cut or crumple parchment so it fits into the chilled pastry without tearing the sides. Fill the lined shell with enough suitable weights to hold the base and sidewalls in place during the first baking stage. A tiny collection of weights in the centre may stop one large bubble but will not necessarily prevent sidewalls from slumping. Avoid pressing sharp or excessively heavy objects directly against unprotected dough.
Hot weights can cause burns, so remove them carefully after the weighted stage, keeping your hands and face clear of steam and heat. Lift the parchment steadily onto a suitable heat-safe surface and allow weights to cool before storing. If you use dried beans or rice as dedicated pie weights, keep them labelled and separate from food intended for cooking and eating.
Choosing a shell for the filling
For a chocolate ganache tart that is not baked after filling, the shell should be fully baked and sufficiently cool before the chocolate mixture is added. Our Chocolate Tart and Raspberry White Chocolate Tart both show why a dry crisp pastry matters: a soft base beneath a creamy filling can become difficult to slice cleanly. Follow the actual pastry and filling methods for each linked recipe instead of assuming a universal time.
A custard filling can need baking after the shell's initial preparation. Eggnog Custard Tart contains eggs, cream and rum or a flavour alternative, which creates its own setting and food-safety considerations. The crust must match the filling recipe. A shell that is fully baked may darken too much if it then spends substantial extra time in an oven with a custard, while an underbaked shell beneath a no-bake filling may remain disappointingly soft.
What to inspect after removing the weights
Look for sides that have set and a base that is still intact. If the bottom balloons in a localized area after the weights are removed, follow the pastry recipe's guidance for safely releasing that bubble. Do not create unnecessary large holes through a shell meant to hold a liquid filling. Continue baking until the stage required by the filling recipe is reached. A fully baked shell should be dry and golden enough to taste pleasant without an additional bake.
When a shell cools, handle it gently. Thin tart rims can break when the pastry is removed from the pan too early. If a no-bake filling needs a cooled shell, allow enough time for that cooling rather than pouring a delicate filling into still-hot pastry. A make-ahead shell should be stored under suitable dry conditions to prevent moisture absorption and breakage.
Common blind-baking errors and better responses
The sides slid down
Check whether the dough was stretched into the pan, whether its rim had enough support and whether it was sufficiently chilled. Next time, press the pastry gently into the contours rather than pulling it tight, and use enough parchment and weights to support the walls.
The base rose into a dome
Weights may not have covered the centre effectively, or steam may have lifted an unweighted patch. Follow the recipe's docking or bubble-release advice at the appropriate stage, without puncturing the shell unnecessarily.
The edges are much darker than the middle
Pan material, oven rack position and the amount of weighted baking may contribute. Do not overbake the rim simply to dry the base; use the pastry method's second stage and protective techniques where applicable.
The crust became soggy after filling
Check whether the shell was baked to the right stage and cooled as directed. The filling may have been unusually wet or stored too long, or the pastry may have been filled too early. Some recipes use a protective seal or other technique, but it must be appropriate to the filling.
Choosing the right pastry for the filling
Blind baking is particularly valuable when a filling is already cooked or does not require a further oven bake. A chocolate ganache tart depends on a fully baked shell because a cream-and-chocolate filling may set during chilling rather than in the oven. Similarly, a white chocolate tart with fresh raspberries needs pastry capable of remaining reasonably crisp once its creamy filling is added.
A baked egg custard brings different considerations. The Eggnog Custard Tart includes cream, milk and eggs, and its filling needs an appropriate bake. The shell's pre-baking stage should match that recipe, not the full bake that works for an unbaked ganache filling. Overbaking the shell before adding custard may produce too-dark edges by the time the filling sets.
When planning several tarts, group recipes by filling type and shell treatment. A fully baked shell for a chilled filling can be prepared in advance as the recipe permits, while one intended for further oven time should be left at the appropriate partial stage. Label prepared shells so they are not confused during assembly.
How to judge the pastry before filling
Look at the base and sidewalls as well as the attractive crimped edge. A dry, golden fully baked shell should no longer have a raw, greasy-looking bottom. A partially baked shell should be sufficiently set to support the planned filling but still able to complete baking with it. The exact colour depends on the dough, pan and recipe; visual checks complement, rather than replace, the source method.
Handle a warm tart shell carefully because thin rims are fragile. If the filling is meant to be added only after the shell cools, allow that time in the schedule. Adding a delicate cream mixture to hot pastry can change the filling's behaviour and soften the crust. Keep fresh berries and other perishable toppings under the correct storage conditions.
Practical pastry equipment choices
Pie weights should be clean and stable. Ceramic weights, dedicated dried beans or rice can support the lined shell where a recipe permits their use. Once beans or rice have been baked as weights, keep them clearly labelled for that purpose rather than returning them to a food cupboard for later cooking. Allow all weights to cool before storing.
Use parchment large enough to protect the base and sides and permit controlled removal. Cutting a piece too small can let weights press directly against the dough or spill during transfer. With very deep pie plates, make sure the support reaches the sides rather than sitting only on the bottom. A metal tart pan can react differently from ceramic or glass; do not change the pan and oven settings simultaneously when diagnosing a new result.
Why crust shrinkage happens
Pastry that is stretched into the pan wants to contract during baking. Dough that was not rested sufficiently or that becomes warm during shaping may also lose definition. Ease it into corners without pulling, follow the prescribed chill, and support the sides appropriately during the weighted bake. A neat crimp is more likely to survive when the dough has not been stretched thin over the rim.
If the rim slides down, check whether it was properly supported by weights, whether the pan was prepared correctly and whether the dough entered the oven cold as directed. These factors are more actionable than blaming the butter alone. One change at a time helps you improve your next tart without creating an entirely new pastry formula.
FAQ: blind baking in advance
Can I make shells the day before?
Many recipes allow make-ahead shells when stored appropriately, but follow the individual pastry directions and protect the brittle rims. Moist fillings should be added when the recipe specifies.
Will a fully baked shell turn soggy?
It can, particularly with very wet fillings or prolonged storage after assembly. Adequate initial baking helps, but filling choice and storage also matter.
Should I blind bake every fruit pie?
No. Some fruit pies are designed to bake raw pastry and filling together. Use the specific recipe's method rather than applying blind baking automatically.
The simplest final quality check is the underside of the pastry, not only its pretty fluted rim. A shell needs to be adequately baked before meeting a moist filling. Always follow the individual tart recipe's visual cues rather than relying on a generic timer, and allow the pastry to cool as directed before adding a chilled filling.
The bottom line
Blind baking is not about baking every empty shell for the same number of minutes. It is about matching the crust to its filling: fully bake for no-bake or already-cooked fillings, partly bake when a moist filling needs a head start, and skip the separate step when your recipe is designed to bake the pastry and filling together. Chill, weight and finish the base properly, and the pastry has a much better chance of tasting as good as the filling above it.
IN PICTURES
From the baking notebook
FROM THE RECIPE BOX