Classic Croissants Recipe

Master homemade French croissants with this foolproof lamination technique that creates the best buttery, flaky layers. This easy baking recipe walks you through the precise folding method for achieving that signature honeycomb texture that makes authentic croissants so special.
Difficulty:
Prep Time:
45 mins
Cook Time:
25 mins
Serves:
12 croissants
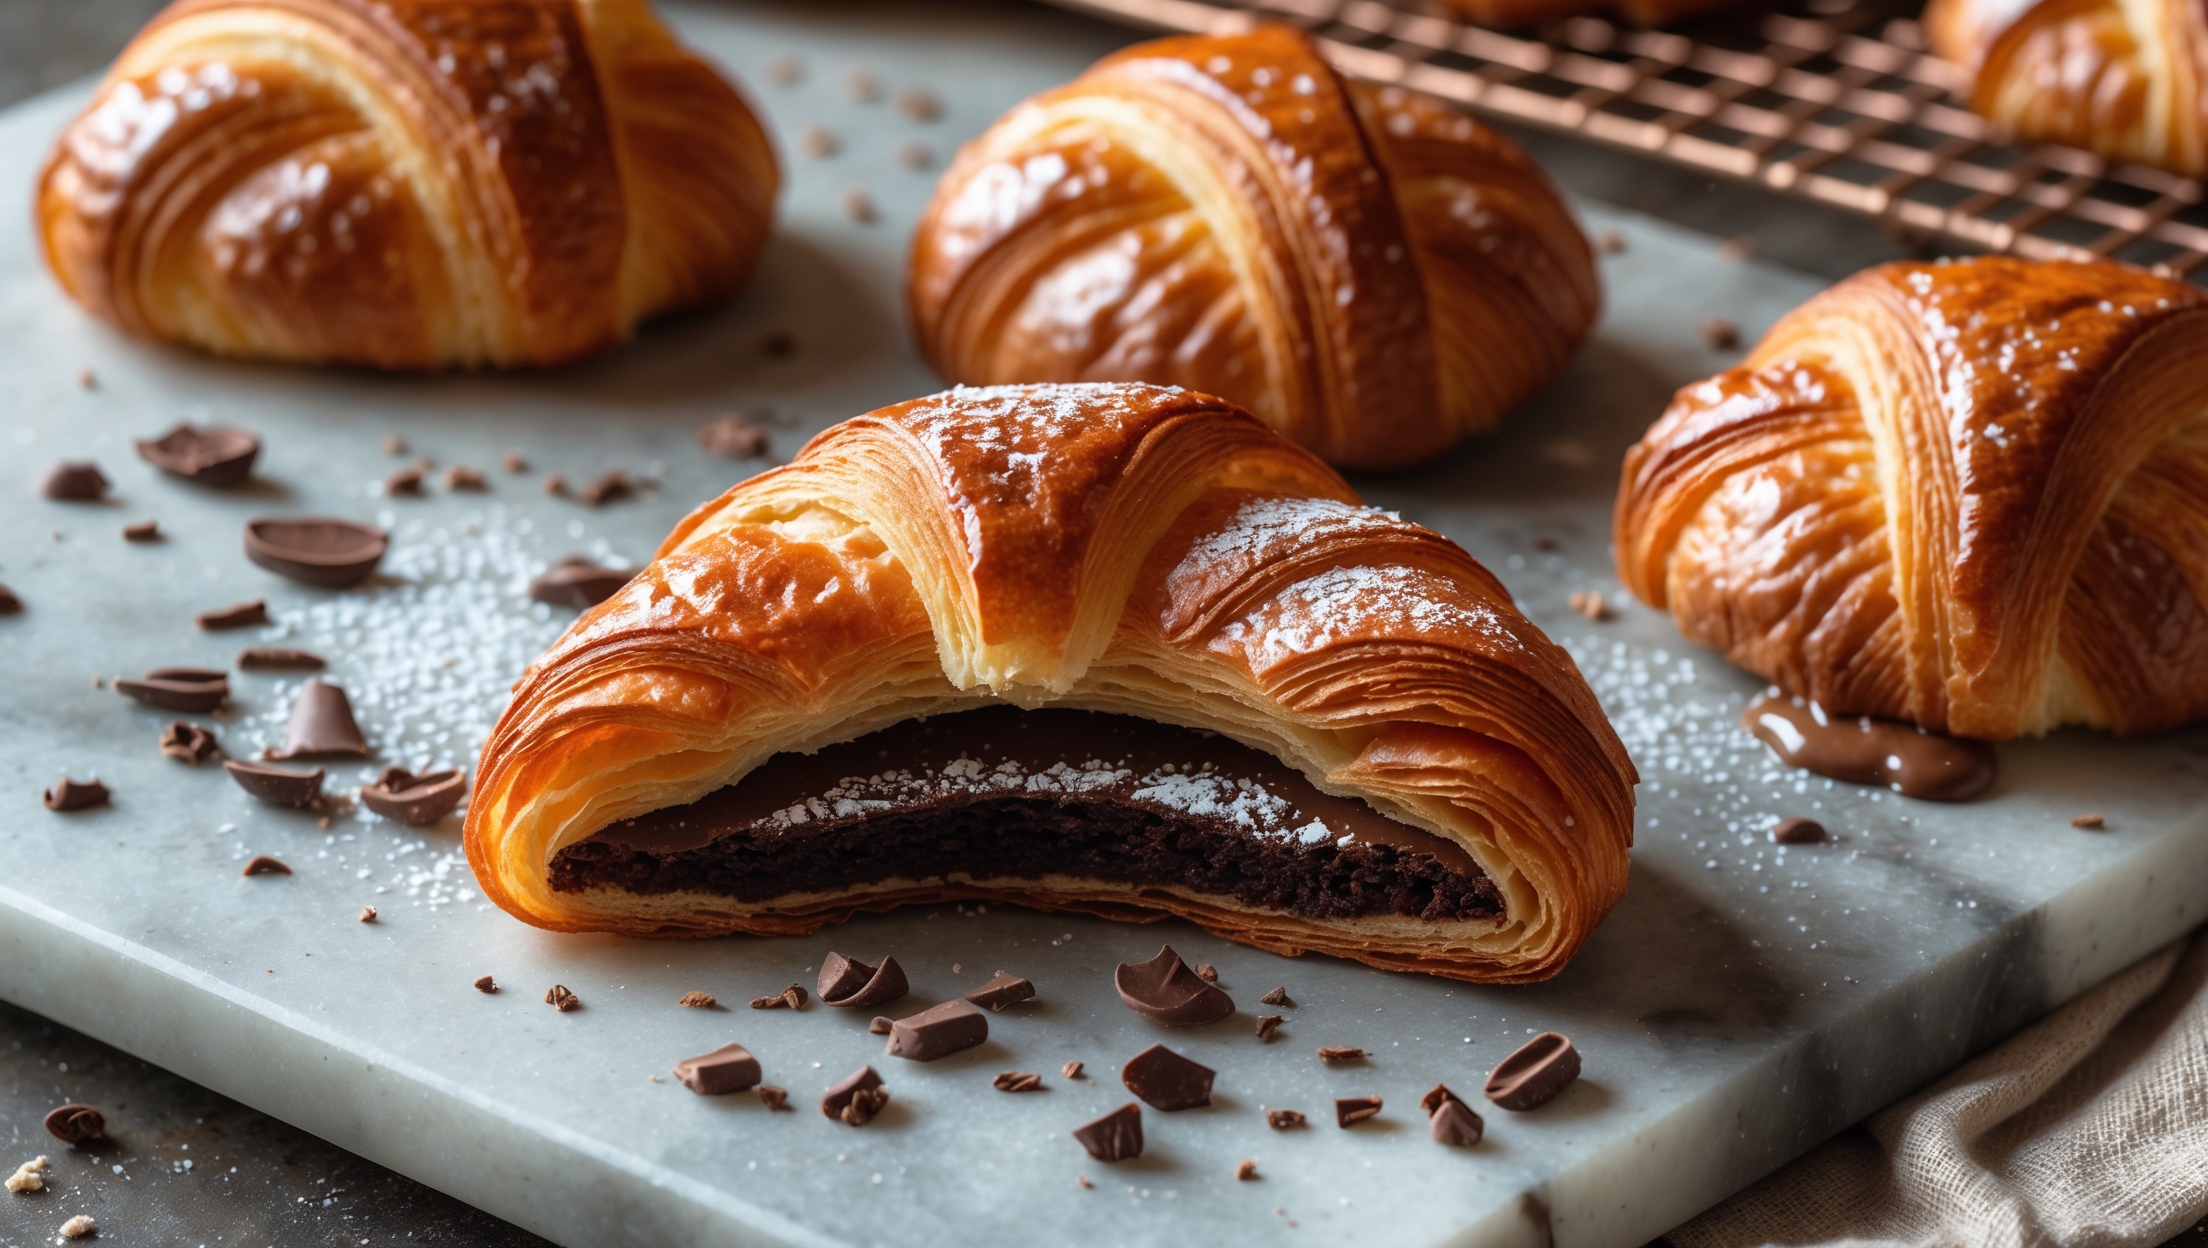
An overhead shot of freshly baked croissants arranged on a rustic wooden board, their golden-brown exteriors glistening in soft morning light. A cross-section view reveals the distinctive honeycomb structure of perfectly laminated dough, with delicate, airy pockets separated by paper-thin layers. Scattered flour and a few butter flakes on the wooden surface hint at the intensive process, while steam rises gently from a just-broken pastry. The contrast between the crisp, deeply caramelized exterior and the tender, slightly chewy interior is evident, with a butter knife and small pot of jam positioned nearby, suggesting the perfect breakfast moment.

Ingredients

<ul class="ingredients-main-list"><li class="ingredients-single-item">500g strong bread flour</li><li class="ingredients-single-item">10g salt</li><li class="ingredients-single-item">75g caster sugar</li><li class="ingredients-single-item">10g instant yeast</li><li class="ingredients-single-item">300ml cold water</li><li class="ingredients-single-item">300g cold unsalted butter (for lamination)</li><li class="ingredients-single-item">1 egg (for egg wash)</li><li class="ingredients-single-item">1 tbsp milk (for egg wash)</li></ul>

Equipment

<ul class="equipment-main-list"><li class="equipment-single-item">Rolling pin</li><li class="equipment-single-item">Pastry brush</li><li class="equipment-single-item">Baking sheets</li><li class="equipment-single-item">Ruler or measuring tape</li><li class="equipment-single-item">Sharp knife or pastry cutter</li></ul>

Directions

<ol class="no-list-style"><li class="MethodStepper"><h4 class="step-title">Step 1</h4>In a large bowl, mix the flour, salt, and sugar. Keep the salt and yeast separate initially (salt can inhibit yeast activation). Make a well in the center, add the yeast and pour in the cold water. Mix until you have a rough dough, then turn out onto a lightly floured surface and knead for 5-7 minutes until smooth and elastic. The dough should feel firm and slightly cool to touch.</li><li class="MethodStepper"><h4 class="step-title">Step 2</h4>Shape the dough into a rectangle, wrap in cling film and refrigerate for at least 1 hour. This rest period allows the gluten to relax and the dough to chill properly, which is crucial for successful lamination.</li><li class="MethodStepper"><h4 class="step-title">Step 3</h4>While the dough chills, prepare your butter block. Place the cold butter between two sheets of parchment paper and beat it with a rolling pin to soften slightly. Form into a 20cm square that's about 1cm thick. The butter should be pliable but still cold – this temperature balance is essential for creating distinct layers.</li><li class="MethodStepper"><h4 class="step-title">Step 4</h4>Roll the chilled dough into a 30cm square. Position the butter block in the center at a 45° angle, like a diamond in a square. Fold the corners of dough over the butter to enclose it completely, pinching the seams to seal thoroughly. You've now created your détrempe (dough and butter package).</li><li class="MethodStepper"><h4 class="step-title">Step 5</h4>Roll this package into a rectangle approximately 45cm x 15cm, keeping edges straight and corners square. Fold the dough in thirds like a business letter (this is your first "turn"). Wrap and refrigerate for 1 hour. The chilling between turns is non-negotiable – it prevents butter from melting into the dough which would ruin the lamination.</li><li class="MethodStepper"><h4 class="step-title">Step 6</h4>Repeat the rolling and folding process two more times, always chilling for an hour between turns. With each turn, you're exponentially increasing the number of alternating dough and butter layers, which will create that signature honeycomb texture.</li><li class="MethodStepper"><h4 class="step-title">Step 7</h4>After the final turn, refrigerate the dough overnight. This extended rest allows the gluten to relax completely and the butter to firm up properly, making the final rolling easier and the layers more distinct.</li><li class="MethodStepper"><h4 class="step-title">Step 8</h4>The next day, roll the dough on a lightly floured surface into a 60cm x 30cm rectangle, maintaining a consistent 4-5mm thickness. Trim the edges with a sharp knife to expose the layers and create straight sides. Cut the dough into triangles with 10cm bases and 20cm heights.</li><li class="MethodStepper"><h4 class="step-title">Step 9</h4>Make a small 1cm notch in the center of each triangle's base – this helps the croissant curve when rolled. Gently stretch each triangle slightly longer before rolling. Starting from the base, roll each triangle towards the point, keeping the point centered. The tighter you roll (without squashing), the more defined your layers will be.</li><li class="MethodStepper"><h4 class="step-title">Step 10</h4>Place the shaped croissants on baking sheets lined with parchment, with the tip tucked underneath to prevent unraveling. Curve the ends slightly inward to create the classic crescent shape. Allow ample space between each for expansion.</li><li class="MethodStepper"><h4 class="step-title">Step 11</h4>Proof the croissants in a warm, draft-free environment (around 24-26°C) for 1.5-2 hours until noticeably puffy. They should jiggle slightly when the tray is gently shaken. Proper proofing is crucial – under-proofed croissants won't expand properly, while over-proofed ones may collapse during baking.</li><li class="MethodStepper"><h4 class="step-title">Step 12</h4>Preheat your oven to 200°C. Whisk the egg with 1 tbsp milk and gently brush this egg wash over the croissants, being careful not to press down on the delicate dough. The egg wash creates that signature golden exterior.</li><li class="MethodStepper"><h4 class="step-title">Step 13</h4>Bake for 18-22 minutes until deeply golden brown. The dark color isn't burning – it's caramelization that provides flavor depth. If they're browning too quickly, reduce temperature to 180°C and continue baking. A properly baked croissant should feel light for its size.</li><li class="MethodStepper"><h4 class="step-title">Step 14</h4>Cool on a wire rack for at least 30 minutes before serving. This cooling period allows the layers to set and the interior to finish cooking from residual heat. When you break open a perfect croissant, you should see a honeycomb of distinct, airy layers. Enjoy your magnificent achievement!</li></ol>

FAQs

Find answers to your most pressing questions about this delicious recipe right here.

What ingredients are used in Classic Croissants Recipe?

Classic croissants require strong bread flour, salt, caster sugar, instant yeast, cold water, cold unsalted butter (for lamination), and an egg mixed with milk for the wash. The high-quality butter is essential for creating those signature flaky layers.

How to cook Classic Croissants Recipe at home?

Learn how to cook Classic Croissants Recipe by mastering the lamination technique - folding butter into dough multiple times to create layers. Mix and chill your dough, prepare your butter block, then complete three turning and folding sequences with resting periods. After overnight chilling, shape, proof, and bake until golden for that perfect honeycomb texture.

Why is my croissant dough becoming sticky during lamination?

Your butter is likely too warm. If croissant dough becomes sticky during lamination, immediately refrigerate it for 30 minutes. Work in a cool kitchen, use cold butter, and never skip the chilling steps between turns. Touch the dough minimally and work quickly to maintain those distinct layers.

Can croissant dough be made ahead and frozen?

Yes! Croissant dough freezes beautifully after lamination is complete. Freeze after the final fold for up to 3 months. Alternatively, freeze shaped unbaked croissants and proof overnight in the refrigerator before baking. You can even freeze fully baked croissants and refresh them in a hot oven.

What's the secret to achieving that distinctive honeycomb texture in French pastries?

The honeycomb texture comes from proper lamination technique and temperature control. Cold but pliable butter, precise folding, adequate resting between turns, and proper proofing are essential. The trapped butter creates steam during baking, pushing the dough layers apart to form those beautiful air pockets.

Want to try something else in ...

Puff Pastry

Try following recommended recipes
{ "@context": "http://schema.org/", "@type": "Recipe", "name": "Classic Croissants Recipe", "author": { "@type": "Person", "name": "Gurbir Aujla", "brand": "What's Baking?", "jobTitle": "Baker" }, "datePublished": "2024-05-26", "description": "Master homemade French croissants with this foolproof lamination technique that creates the best buttery, flaky layers. This easy baking recipe walks you through the precise folding method for achieving that signature honeycomb texture that makes authentic croissants so special.", "prepTime": "PT45M", "cookTime": "PT25M", "totalTime": "PT16H10M", "keywords": "French croissants, laminated dough, buttery pastry, flaky layers, breakfast pastry", "recipeYield": "12", "recipeCategory": "Breakfast", "recipeCuisine": "French", "nutrition": { "@type": "NutritionInformation", "calories": "320 calories", "carbohydrateContent": "28 g", "proteinContent": "5 g", "fatContent": "22 g", "saturatedFatContent": "14 g", "cholesterolContent": "80 mg", "sodiumContent": "230 mg", "sugarContent": "3 g", "servingSize": "1 croissant" }, "recipeIngredient": [ "500g strong bread flour", "10g salt", "75g caster sugar", "10g instant yeast", "300ml cold water", "300g cold unsalted butter (for lamination)", "1 egg (for egg wash)", "1 tbsp milk (for egg wash)" ], "recipeInstructions": [ { "@type": "HowToStep", "name": "Make the Dough", "text": "In a large bowl, mix the flour, salt, and sugar. Keep the salt and yeast separate initially (salt can inhibit yeast activation). Make a well in the center, add the yeast and pour in the cold water. Mix until you have a rough dough, then turn out onto a lightly floured surface and knead for 5-7 minutes until smooth and elastic. The dough should feel firm and slightly cool to touch." }, { "@type": "HowToStep", "name": "First Chilling", "text": "Shape the dough into a rectangle, wrap in cling film and refrigerate for at least 1 hour. This rest period allows the gluten to relax and the dough to chill properly, which is crucial for successful lamination." }, { "@type": "HowToStep", "name": "Prepare Butter Block", "text": "While the dough chills, prepare your butter block. Place the cold butter between two sheets of parchment paper and beat it with a rolling pin to soften slightly. Form into a 20cm square that's about 1cm thick. The butter should be pliable but still cold – this temperature balance is essential for creating distinct layers." }, { "@type": "HowToStep", "name": "Encase Butter", "text": "Roll the chilled dough into a 30cm square. Position the butter block in the center at a 45° angle, like a diamond in a square. Fold the corners of dough over the butter to enclose it completely, pinching the seams to seal thoroughly. You've now created your détrempe (dough and butter package)." }, { "@type": "HowToStep", "name": "First Turn", "text": "Roll this package into a rectangle approximately 45cm x 15cm, keeping edges straight and corners square. Fold the dough in thirds like a business letter (this is your first \"turn\"). Wrap and refrigerate for 1 hour. The chilling between turns is non-negotiable – it prevents butter from melting into the dough which would ruin the lamination." }, { "@type": "HowToStep", "name": "Complete Lamination", "text": "Repeat the rolling and folding process two more times, always chilling for an hour between turns. With each turn, you're exponentially increasing the number of alternating dough and butter layers, which will create that signature honeycomb texture." }, { "@type": "HowToStep", "name": "Overnight Rest", "text": "After the final turn, refrigerate the dough overnight. This extended rest allows the gluten to relax completely and the butter to firm up properly, making the final rolling easier and the layers more distinct." }, { "@type": "HowToStep", "name": "Shape Croissants", "text": "The next day, roll the dough on a lightly floured surface into a 60cm x 30cm rectangle, maintaining a consistent 4-5mm thickness. Trim the edges with a sharp knife to expose the layers and create straight sides. Cut the dough into triangles with 10cm bases and 20cm heights." }, { "@type": "HowToStep", "name": "Roll Croissants", "text": "Make a small 1cm notch in the center of each triangle's base – this helps the croissant curve when rolled. Gently stretch each triangle slightly longer before rolling. Starting from the base, roll each triangle towards the point, keeping the point centered. The tighter you roll (without squashing), the more defined your layers will be." }, { "@type": "HowToStep", "name": "Arrange and Shape", "text": "Place the shaped croissants on baking sheets lined with parchment, with the tip tucked underneath to prevent unraveling. Curve the ends slightly inward to create the classic crescent shape. Allow ample space between each for expansion." }, { "@type": "HowToStep", "name": "Proof", "text": "Proof the croissants in a warm, draft-free environment (around 24-26°C) for 1.5-2 hours until noticeably puffy. They should jiggle slightly when the tray is gently shaken. Proper proofing is crucial – under-proofed croissants won't expand properly, while over-proofed ones may collapse during baking." }, { "@type": "HowToStep", "name": "Prepare for Baking", "text": "Preheat your oven to 200°C. Whisk the egg with 1 tbsp milk and gently brush this egg wash over the croissants, being careful not to press down on the delicate dough. The egg wash creates that signature golden exterior." }, { "@type": "HowToStep", "name": "Bake", "text": "Bake for 18-22 minutes until deeply golden brown. The dark color isn't burning – it's caramelization that provides flavor depth. If they're browning too quickly, reduce temperature to 180°C and continue baking. A properly baked croissant should feel light for its size." }, { "@type": "HowToStep", "name": "Cool and Enjoy", "text": "Cool on a wire rack for at least 30 minutes before serving. This cooling period allows the layers to set and the interior to finish cooking from residual heat. When you break open a perfect croissant, you should see a honeycomb of distinct, airy layers. Enjoy your magnificent achievement!" } ], "aggregateRating": { "@type": "AggregateRating", "ratingValue": "5", "ratingCount": "157" }, "review": [ { "@type": "Review", "author": "Sophie Laurent", "datePublished": "2024-05-10", "reviewBody": "Flakiest pastry I've ever made! The detailed instructions made the lamination process much less intimidating than I expected. The results were absolutely stunning - buttery layers that shattered beautifully just like in a French bakery.", "name": "Bakery-Quality Results", "reviewRating": { "@type": "Rating", "ratingValue": "5" } }, { "@type": "Review", "author": "Raj Patel", "datePublished": "2024-05-12", "reviewBody": "Better than Parisian bakeries! I've tried many croissant recipes before but this one truly delivers on the perfect honeycomb structure. The overnight rest is key for developing the flavors. My family was amazed that these were homemade.", "name": "Worth Every Minute", "reviewRating": { "@type": "Rating", "ratingValue": "5" } }, { "@type": "Review", "author": "Maria Gonzalez", "datePublished": "2024-05-15", "reviewBody": "Worth every minute of folding! I was nervous about making laminated dough but the step-by-step instructions were so clear. The butter block technique worked perfectly and I achieved those beautiful distinct layers. Will definitely make again!", "name": "Perfect First Attempt", "reviewRating": { "@type": "Rating", "ratingValue": "5" } }, { "@type": "Review", "author": "Anders Johansson", "datePublished": "2024-05-18", "reviewBody": "Finally conquered my baking fear! The temperature tips were crucial - keeping everything cold but workable made all the difference. I made a double batch and froze half of the shaped croissants for later baking. They turned out magnificent both times.", "name": "Exceptional Technique", "reviewRating": { "@type": "Rating", "ratingValue": "5" } }, { "@type": "Review", "author": "Naomi Chen", "datePublished": "2024-05-20", "reviewBody": "My weekend project obsession now! These croissants are absolutely divine - the contrast between the crisp exterior and the tender, slightly chewy interior is perfect. The detailed instructions on lamination technique helped me achieve beautiful layers on my first try.", "name": "Stunning Results", "reviewRating": { "@type": "Rating", "ratingValue": "5" } } ], "url": "https://www.whatsbaking.co/recipes/classic-croissants-recipe" }
{ "@context": "https://schema.org", "@type": "FAQPage", "mainEntity": [ { "@type": "Question", "name": "What ingredients are used in Classic Croissants Recipe?", "acceptedAnswer": { "@type": "Answer", "text": "Classic croissants require strong bread flour, salt, caster sugar, instant yeast, cold water, cold unsalted butter (for lamination), and an egg mixed with milk for the wash. The high-quality butter is essential for creating those signature flaky layers." } }, { "@type": "Question", "name": "How to cook Classic Croissants Recipe at home?", "acceptedAnswer": { "@type": "Answer", "text": "Learn how to cook Classic Croissants Recipe by mastering the lamination technique - folding butter into dough multiple times to create layers. Mix and chill your dough, prepare your butter block, then complete three turning and folding sequences with resting periods. After overnight chilling, shape, proof, and bake until golden for that perfect honeycomb texture." } }, { "@type": "Question", "name": "Why is my croissant dough becoming sticky during lamination?", "acceptedAnswer": { "@type": "Answer", "text": "Your butter is likely too warm. If croissant dough becomes sticky during lamination, immediately refrigerate it for 30 minutes. Work in a cool kitchen, use cold butter, and never skip the chilling steps between turns. Touch the dough minimally and work quickly to maintain those distinct layers." } }, { "@type": "Question", "name": "Can croissant dough be made ahead and frozen?", "acceptedAnswer": { "@type": "Answer", "text": "Yes! Croissant dough freezes beautifully after lamination is complete. Freeze after the final fold for up to 3 months. Alternatively, freeze shaped unbaked croissants and proof overnight in the refrigerator before baking. You can even freeze fully baked croissants and refresh them in a hot oven." } }, { "@type": "Question", "name": "What's the secret to achieving that distinctive honeycomb texture in French pastries?", "acceptedAnswer": { "@type": "Answer", "text": "The honeycomb texture comes from proper lamination technique and temperature control. Cold but pliable butter, precise folding, adequate resting between turns, and proper proofing are essential. The trapped butter creates steam during baking, pushing the dough layers apart to form those beautiful air pockets." } } ] }