Vegan Chocolate Croissants Recipe
Learn how to make the best homemade vegan chocolate croissants with this foolproof recipe. These dairy-free pastries feature the same flaky, buttery layers as traditional versions, with rich dark chocolate inside. Master the art of vegan lamination for perfect results every time!
Difficulty:
Intermediate
Prep Time:
3 hours (plus overnight resting)
Cook Time:
20 mins
Serves:
12 croissants
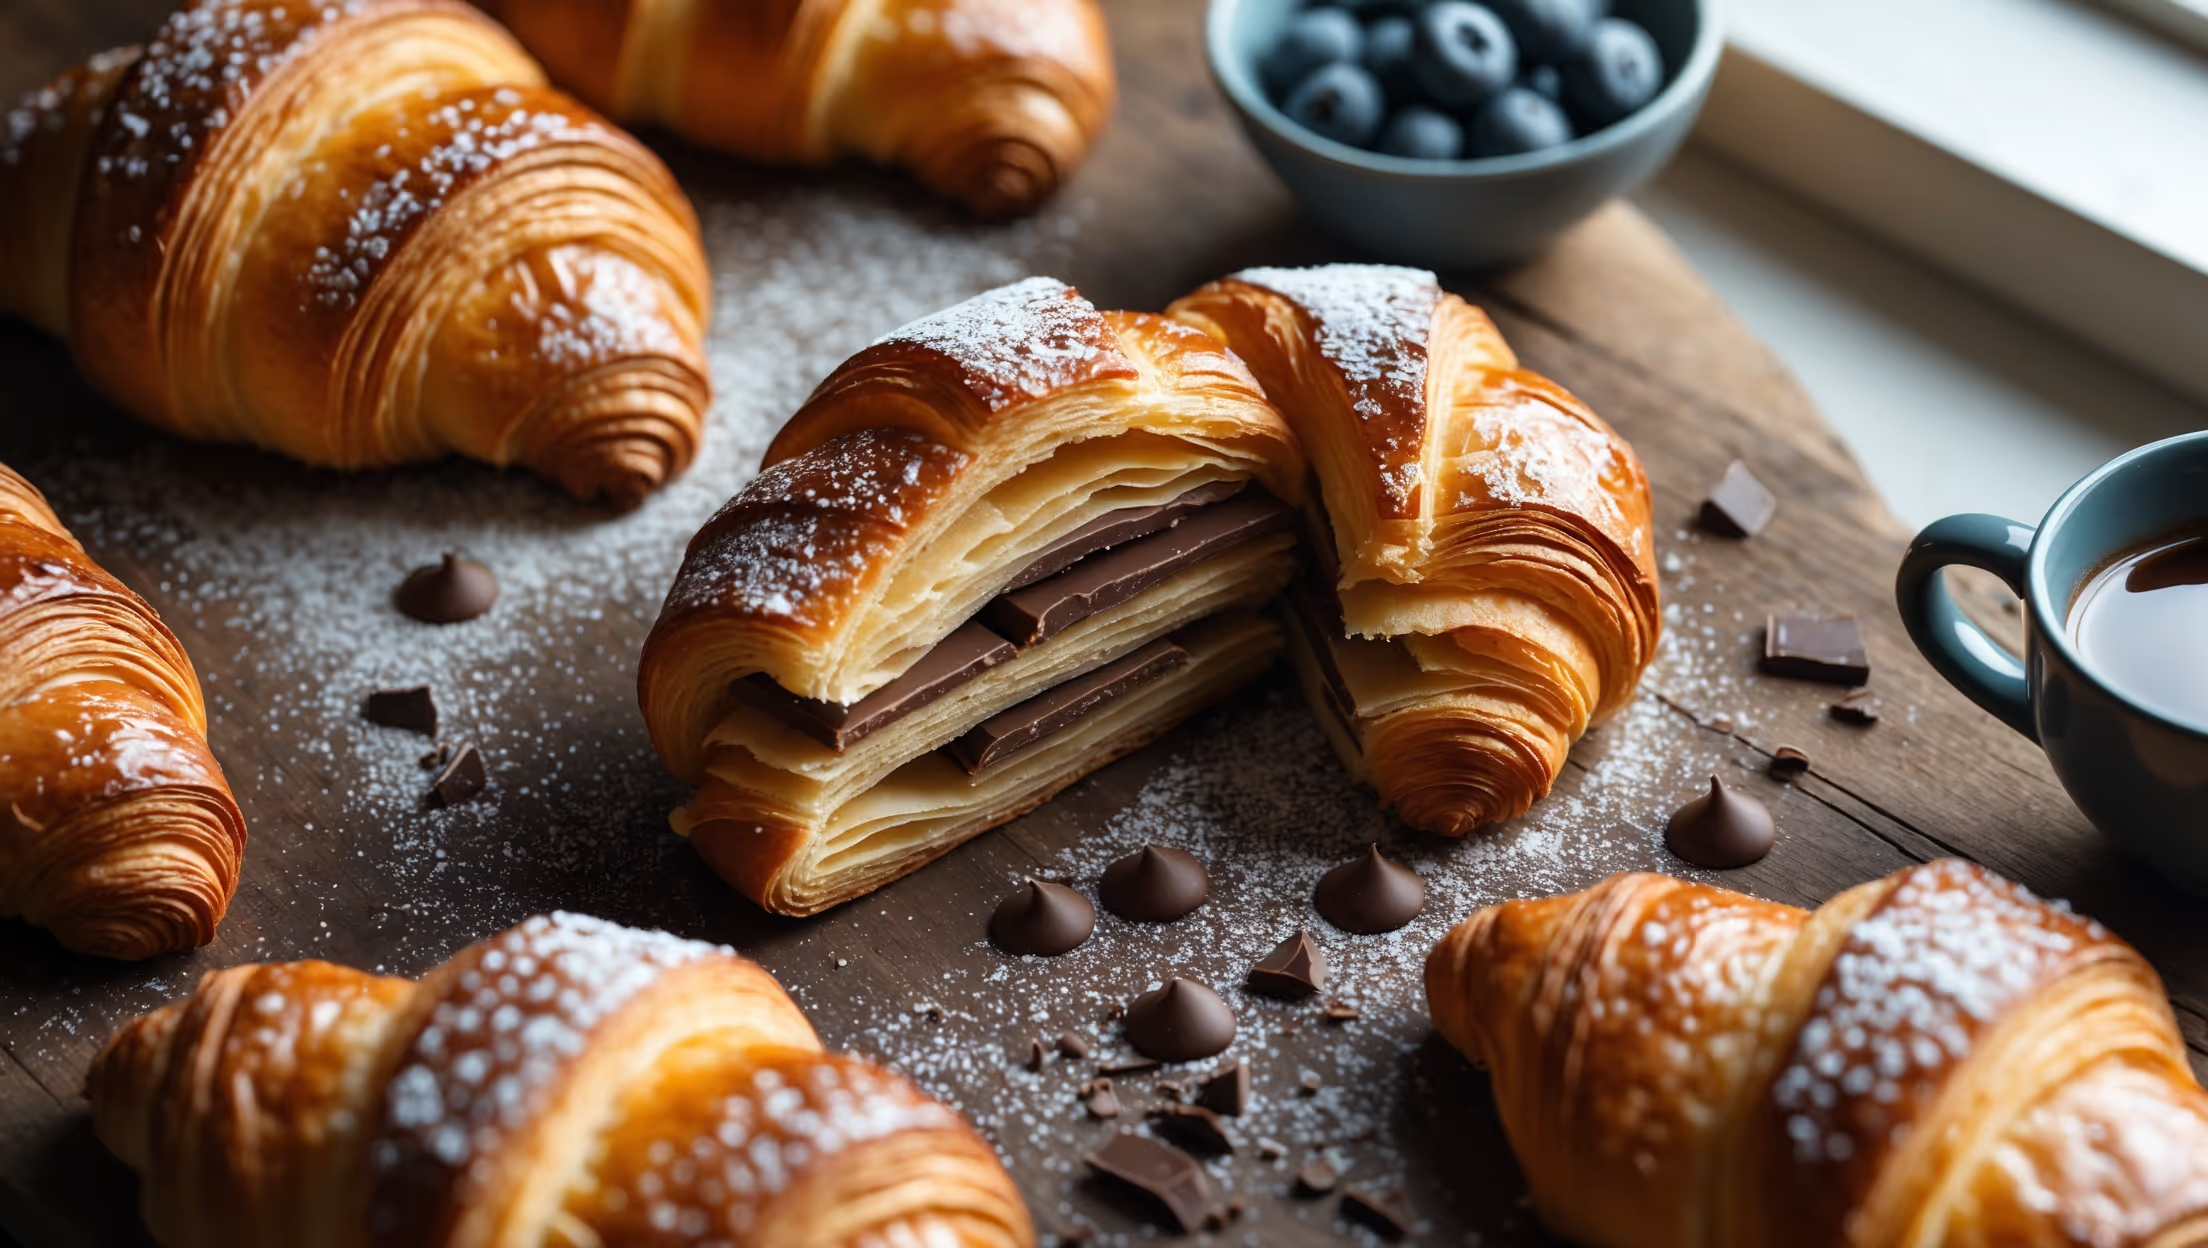
An overhead shot of golden-brown vegan chocolate croissants arranged on a rustic wooden board, with one croissant torn open to reveal layers of flaky pastry and melting dark chocolate inside. Soft natural light streams from a nearby window, highlighting the delicate lamination of the pastry and creating gentle shadows. A light dusting of powdered sugar and a scattering of chocolate shavings surround the croissants, while a small bowl of fresh berries and a cup of steaming coffee complete the styling. The contrast between the crisp outer shell and the tender interior showcases the perfect bake, with visible layers demonstrating the successful plant-based lamination technique.

Ingredients

<ul class="ingredients-main-list"><li class="ingredients-single-item">500g bread flour</li><li class="ingredients-single-item">10g instant dry yeast</li><li class="ingredients-single-item">60g granulated sugar</li><li class="ingredients-single-item">10g salt</li><li class="ingredients-single-item">60ml vegetable oil</li><li class="ingredients-single-item">300ml cold plant milk (soy or oat works best)</li><li class="ingredients-single-item">250g vegan block butter (not spread)</li><li class="ingredients-single-item">200g high-quality dark chocolate, chopped into batons</li><li class="ingredients-single-item">30ml plant milk for brushing</li><li class="ingredients-single-item">15g powdered sugar for dusting (optional)</li></ul>

Nutrition Facts (per serving)

🍽️ Serving Size: 1 serving
🔥 Calories: 320 calories
🥑 Fat: 18 g
🧈 Saturated Fat: 6 g
🍞 Carbohydrates: 35 g
🍭 Sugar: 8 g
🍗 Protein: 4 g
🫀 Cholesterol: 0 mg
🧂 Sodium: 210 mg

Equipment

<ul class="equipment-main-list"><li class="equipment-single-item">Rolling pin</li><li class="equipment-single-item">Large baking sheets</li><li class="equipment-single-item">Ruler or measuring tape</li><li class="equipment-single-item">Pastry brush</li><li class="equipment-single-item">Bench scraper</li></ul>

Directions

<ol class="no-list-style"><li class="MethodStepper"><h4 class="step-title">Step 1</h4>Make the dough: In a large bowl, mix the bread flour, instant yeast, sugar, and salt. Create a well in the center and pour in the vegetable oil and cold plant milk. Mix until a shaggy dough forms, then turn onto a lightly floured surface and knead for 5-7 minutes until smooth and elastic. The dough should be firm but pliable - this structure will support the layers during lamination.</li><li class="MethodStepper"><h4 class="step-title">Step 2</h4>Shape the dough into a rectangle, wrap tightly in plastic wrap, and refrigerate for at least 2 hours or overnight. Cold dough is crucial for successful lamination as it prevents the butter from melting into the dough layers.</li><li class="MethodStepper"><h4 class="step-title">Step 3</h4>Prepare the vegan butter block: Place the cold vegan block butter between two sheets of parchment paper. Using a rolling pin, pound and shape it into a 20cm x 15cm rectangle. Return to the refrigerator to firm up while you roll out the dough.</li><li class="MethodStepper"><h4 class="step-title">Step 4</h4>On a lightly floured surface, roll the chilled dough into a rectangle approximately 40cm x 20cm. Position the butter block on one half of the dough so the edges align on three sides, then fold the other half of dough over the butter, encasing it completely. Pinch the edges to seal in the butter.</li><li class="MethodStepper"><h4 class="step-title">Step 5</h4>First turn: Roll the dough into a rectangle about 45cm x 20cm, keeping the edges straight and even. Fold the dough like a letter: fold the bottom third up, then the top third down over it. Turn the dough 90 degrees so the open edge faces right. This orientation is important for creating evenly distributed layers.</li><li class="MethodStepper"><h4 class="step-title">Step 6</h4>Wrap the dough in plastic wrap and refrigerate for 1 hour. This resting period allows the gluten to relax and the butter to firm up again, preventing it from melting during subsequent folding.</li><li class="MethodStepper"><h4 class="step-title">Step 7</h4>Second and third turns: Repeat the rolling and folding process two more times, always starting with the open edge facing right. Refrigerate for 1 hour between each turn. After the third turn, refrigerate the dough overnight or for at least 8 hours. This extended rest develops flavor and ensures the butter is properly chilled for the final rolling.</li><li class="MethodStepper"><h4 class="step-title">Step 8</h4>On a lightly floured surface, roll the dough into a large rectangle approximately 60cm x 30cm and about 4mm thick. Trim the edges with a sharp knife to create straight sides, which will give your croissants a more professional appearance.</li><li class="MethodStepper"><h4 class="step-title">Step 9</h4>Cut the dough into triangles with a 10cm base and 20cm height. Make a small 1cm slit in the middle of each base to help the croissants curve when rolled. Place a chocolate baton at the wide end of each triangle.</li><li class="MethodStepper"><h4 class="step-title">Step 10</h4>Roll up each triangle from the base to the tip, gently stretching the dough as you roll. Place shaped croissants on parchment-lined baking sheets, with the tip tucked underneath. Curve the ends inward to create the classic croissant shape.</li><li class="MethodStepper"><h4 class="step-title">Step 11</h4>Cover loosely with plastic wrap and let rise at room temperature (around 21°C) for 1.5-2 hours until noticeably puffy. The croissants should nearly double in size and gently spring back when lightly touched.</li><li class="MethodStepper"><h4 class="step-title">Step 12</h4>Preheat your oven to 200°C. Gently brush the croissants with plant milk, taking care not to deflate them. Bake for 5 minutes, then reduce the temperature to 180°C and bake for another 15-18 minutes until deeply golden brown. The high initial temperature creates steam that helps the layers separate.</li><li class="MethodStepper"><h4 class="step-title">Step 13</h4>Allow to cool on the baking sheets for 5 minutes before transferring to a wire rack. The chocolate inside will be extremely hot, so let them cool for at least 10 minutes before serving. If desired, dust with powdered sugar just before serving. Enjoy warm when the chocolate is still slightly melted!</li></ol>

FAQs

Find answers to your most pressing questions about this delicious recipe right here.

What ingredients are used in Vegan Chocolate Croissants Recipe?

This recipe uses bread flour, instant dry yeast, sugar, salt, vegetable oil, plant milk, vegan block butter, high-quality dark chocolate, and optional powdered sugar for dusting. The vegan butter and plant milk substitute traditional dairy for a completely plant-based pastry.

How to cook Vegan Chocolate Croissants Recipe at home?

Learn how to cook Vegan Chocolate Croissants by mastering the lamination technique—folding vegan butter between layers of dough, creating the signature flaky texture. The process involves multiple chilling and folding stages, followed by shaping, proofing, and baking at a high initial temperature to create those beautiful layers.

Why do my vegan croissants not have the same flaky layers as traditional ones?

Unsuccessful flaky layers often result from butter melting into the dough too soon. Use cold vegan block butter (not spread), ensure proper chilling between folds, maintain cold working conditions, and follow the resting times exactly. The right vegan butter with high fat content is crucial for successful lamination.

Can I freeze homemade plant-based chocolate pastries?

Absolutely! Freeze shaped unbaked croissants on a baking sheet, then transfer to an airtight container once solid. Bake straight from frozen, adding 5-7 minutes to the baking time. Alternatively, freeze baked croissants and reheat at 160°C for 10 minutes to restore crispness.

What's the best vegan butter for achieving perfect laminated pastry?

Look for firm block-style vegan butter with at least 75% fat content and minimal water. Brands like Naturli, Flora Plant Butter, or Miyoko's work exceptionally well as they maintain their structure during lamination without melting too quickly, creating those professional bakery-quality layers.

Want to try something else in ...

Vegan Breads & Breakfast Bakes

Try following recommended recipes
No items found.

{ "@context": "http://schema.org/", "@type": "Recipe", "name": "Vegan Chocolate Croissants Recipe", "image": ["https://cdn.prod.website-files.com/67f19ab882e7325b0d63c86a/68274be21a69f44bc67bccbb_Leonardo_Phoenix_10_An_overhead_shot_of_goldenbrown_vegan_choc_0.jpeg"], "author": { "@type": "Person", "name": "Gurbir Aujla", "brand": "What's Baking?", "jobTitle": "Baker" }, "datePublished": "2024-06-14", "description": "Learn how to make the best homemade vegan chocolate croissants with this foolproof recipe. These dairy-free pastries feature the same flaky, buttery layers as traditional versions, with rich dark chocolate inside. Master the art of vegan lamination for perfect results every time!", "prepTime": "PT3H", "cookTime": "PT20M", "totalTime": "PT11H20M", "keywords": "vegan croissants, chocolate croissants, dairy-free pastry, plant-based breakfast, French vegan pastry", "recipeYield": "12", "recipeCategory": "Breakfast", "recipeCuisine": "French", "nutrition": { "@type": "NutritionInformation", "calories": "320 calories", "carbohydrateContent": "35 g", "proteinContent": "4 g", "fatContent": "18 g", "saturatedFatContent": "6 g", "cholesterolContent": "0 mg", "sodiumContent": "210 mg", "sugarContent": "8 g", "servingSize": "1 serving" }, "recipeIngredient": [ "500g bread flour", "10g instant dry yeast", "60g granulated sugar", "10g salt", "60ml vegetable oil", "300ml cold plant milk (soy or oat works best)", "250g vegan block butter (not spread)", "200g high-quality dark chocolate, chopped into batons", "30ml plant milk for brushing", "15g powdered sugar for dusting (optional)" ], "recipeInstructions": [ { "@type": "HowToStep", "name": "Prepare Dough", "text": "In a large bowl, mix the bread flour, instant yeast, sugar, and salt. Create a well in the center and pour in the vegetable oil and cold plant milk. Mix until a shaggy dough forms, then turn onto a lightly floured surface and knead for 5-7 minutes until smooth and elastic. The dough should be firm but pliable - this structure will support the layers during lamination." }, { "@type": "HowToStep", "name": "Chill Dough", "text": "Shape the dough into a rectangle, wrap tightly in plastic wrap, and refrigerate for at least 2 hours or overnight. Cold dough is crucial for successful lamination as it prevents the butter from melting into the dough layers." }, { "@type": "HowToStep", "name": "Prepare Butter Block", "text": "Place the cold vegan block butter between two sheets of parchment paper. Using a rolling pin, pound and shape it into a 20cm x 15cm rectangle. Return to the refrigerator to firm up while you roll out the dough." }, { "@type": "HowToStep", "name": "Encase Butter", "text": "On a lightly floured surface, roll the chilled dough into a rectangle approximately 40cm x 20cm. Position the butter block on one half of the dough so the edges align on three sides, then fold the other half of dough over the butter, encasing it completely. Pinch the edges to seal in the butter." }, { "@type": "HowToStep", "name": "First Turn", "text": "Roll the dough into a rectangle about 45cm x 20cm, keeping the edges straight and even. Fold the dough like a letter: fold the bottom third up, then the top third down over it. Turn the dough 90 degrees so the open edge faces right. This orientation is important for creating evenly distributed layers." }, { "@type": "HowToStep", "name": "Rest Dough", "text": "Wrap the dough in plastic wrap and refrigerate for 1 hour. This resting period allows the gluten to relax and the butter to firm up again, preventing it from melting during subsequent folding." }, { "@type": "HowToStep", "name": "Complete Lamination", "text": "Repeat the rolling and folding process two more times, always starting with the open edge facing right. Refrigerate for 1 hour between each turn. After the third turn, refrigerate the dough overnight or for at least 8 hours. This extended rest develops flavor and ensures the butter is properly chilled for the final rolling." }, { "@type": "HowToStep", "name": "Roll Final Dough", "text": "On a lightly floured surface, roll the dough into a large rectangle approximately 60cm x 30cm and about 4mm thick. Trim the edges with a sharp knife to create straight sides, which will give your croissants a more professional appearance." }, { "@type": "HowToStep", "name": "Cut and Fill", "text": "Cut the dough into triangles with a 10cm base and 20cm height. Make a small 1cm slit in the middle of each base to help the croissants curve when rolled. Place a chocolate baton at the wide end of each triangle." }, { "@type": "HowToStep", "name": "Shape Croissants", "text": "Roll up each triangle from the base to the tip, gently stretching the dough as you roll. Place shaped croissants on parchment-lined baking sheets, with the tip tucked underneath. Curve the ends inward to create the classic croissant shape." }, { "@type": "HowToStep", "name": "Final Rise", "text": "Cover loosely with plastic wrap and let rise at room temperature (around 21°C) for 1.5-2 hours until noticeably puffy. The croissants should nearly double in size and gently spring back when lightly touched." }, { "@type": "HowToStep", "name": "Bake", "text": "Preheat your oven to 200°C. Gently brush the croissants with plant milk, taking care not to deflate them. Bake for 5 minutes, then reduce the temperature to 180°C and bake for another 15-18 minutes until deeply golden brown. The high initial temperature creates steam that helps the layers separate." }, { "@type": "HowToStep", "name": "Cool and Serve", "text": "Allow to cool on the baking sheets for 5 minutes before transferring to a wire rack. The chocolate inside will be extremely hot, so let them cool for at least 10 minutes before serving. If desired, dust with powdered sugar just before serving. Enjoy warm when the chocolate is still slightly melted!" } ], "aggregateRating": { "@type": "AggregateRating", "ratingValue": "5", "ratingCount": "156" }, "review": [ { "@type": "Review", "author": "Amelia Richardson", "datePublished": "2024-06-01", "reviewBody": "I never thought I could achieve such perfect flaky layers in a vegan croissant! The detailed instructions really paid off, and the chocolate-to-pastry ratio is spot on. Definitely worth the effort!", "name": "Flaky Perfection", "reviewRating": { "@type": "Rating", "ratingValue": "5" } }, { "@type": "Review", "author": "Santiago Gomez", "datePublished": "2024-05-28", "reviewBody": "These croissants fooled my entire family - no one believed they were vegan! The lamination technique worked brilliantly, and they were even better than what I can buy at our local bakery. Making these again for brunch this weekend!", "name": "Vegan Magic", "reviewRating": { "@type": "Rating", "ratingValue": "5" } }, { "@type": "Review", "author": "Freya Jensen", "datePublished": "2024-05-25", "reviewBody": "I'm impressed with how these turned out on my first attempt! The step-by-step instructions made the lamination process approachable. The dark chocolate filling melts perfectly, and the pastry has that authentic buttery flavor despite being plant-based.", "name": "First-Time Success", "reviewRating": { "@type": "Rating", "ratingValue": "5" } }, { "@type": "Review", "author": "Hiroshi Tanaka", "datePublished": "2024-06-05", "reviewBody": "The overnight rest really develops fantastic flavor in these croissants. I've made traditional ones for years but was skeptical about vegan versions - I shouldn't have been! These are incredible and my non-vegan guests couldn't tell the difference.", "name": "Better Than Traditional", "reviewRating": { "@type": "Rating", "ratingValue": "5" } }, { "@type": "Review", "author": "Priya Sharma", "datePublished": "2024-05-30", "reviewBody": "I've made these twice already and they're absolutely divine! The detailed instructions about temperature and resting times are crucial - follow them exactly and you'll get perfect results. The chocolate batons create the most wonderful melty center.", "name": "Repeat Baker", "reviewRating": { "@type": "Rating", "ratingValue": "5" } } ]}

{ "@context": "https://schema.org", "@type": "FAQPage", "mainEntity": [ { "@type": "Question", "name": "What ingredients are used in Vegan Chocolate Croissants Recipe?", "acceptedAnswer": { "@type": "Answer", "text": "This recipe uses bread flour, instant dry yeast, sugar, salt, vegetable oil, plant milk, vegan block butter, high-quality dark chocolate, and optional powdered sugar for dusting. The vegan butter and plant milk substitute traditional dairy for a completely plant-based pastry." } }, { "@type": "Question", "name": "How to cook Vegan Chocolate Croissants Recipe at home?", "acceptedAnswer": { "@type": "Answer", "text": "Learn how to cook Vegan Chocolate Croissants by mastering the lamination technique—folding vegan butter between layers of dough, creating the signature flaky texture. The process involves multiple chilling and folding stages, followed by shaping, proofing, and baking at a high initial temperature to create those beautiful layers." } }, { "@type": "Question", "name": "Why do my vegan croissants not have the same flaky layers as traditional ones?", "acceptedAnswer": { "@type": "Answer", "text": "Unsuccessful flaky layers often result from butter melting into the dough too soon. Use cold vegan block butter (not spread), ensure proper chilling between folds, maintain cold working conditions, and follow the resting times exactly. The right vegan butter with high fat content is crucial for successful lamination." } }, { "@type": "Question", "name": "Can I freeze homemade plant-based chocolate pastries?", "acceptedAnswer": { "@type": "Answer", "text": "Absolutely! Freeze shaped unbaked croissants on a baking sheet, then transfer to an airtight container once solid. Bake straight from frozen, adding 5-7 minutes to the baking time. Alternatively, freeze baked croissants and reheat at 160°C for 10 minutes to restore crispness." } }, { "@type": "Question", "name": "What's the best vegan butter for achieving perfect laminated pastry?", "acceptedAnswer": { "@type": "Answer", "text": "Look for firm block-style vegan butter with at least 75% fat content and minimal water. Brands like Naturli, Flora Plant Butter, or Miyoko's work exceptionally well as they maintain their structure during lamination without melting too quickly, creating those professional bakery-quality layers." } } ]}