Wild Yeast Kanelsnurrer with 48-Hour Cold Proof Recipe

Learn how to make authentic homemade kanelsnurrer (Scandinavian cinnamon twists) using wild yeast and a 48-hour cold proof technique for the best flavor development. This foolproof method results in incredibly flaky, aromatic pastries with perfect lamination—better than any bakery version!
Difficulty:
Intermediate
Prep Time:
1 hour (plus 48 hours proofing)
Cook Time:
15 mins
Serves:
12 kanelsnurrer
An overhead shot of freshly baked kanelsnurrer arranged on a rustic wooden board, their golden-brown surfaces glistening with a light sugar glaze under soft natural light. A cross-section view reveals the intricate spiral pattern of buttery layers interwoven with rich cinnamon filling, while steam still rises gently from the torn edge. Scattered cinnamon sticks, vanilla beans, and a sprinkle of raw sugar add context to the scene, with a linen napkin and ceramic mug of coffee suggesting the perfect Scandinavian fika pairing. The distinctive wild yeast-risen texture is evident in the open, airy crumb structure, highlighting the 48-hour fermentation that created these beautifully laminated Danish pastries.

Ingredients

<ul class="ingredients-main-list"><li class="ingredients-single-item">250g active sourdough starter (100% hydration)</li><li class="ingredients-single-item">500g strong bread flour</li><li class="ingredients-single-item">60g granulated sugar</li><li class="ingredients-single-item">10g salt</li><li class="ingredients-single-item">180ml whole milk, cold</li><li class="ingredients-single-item">2 large eggs</li><li class="ingredients-single-item">100g unsalted butter, softened</li><li class="ingredients-single-item">For the lamination: 250g cold unsalted butter</li><li class="ingredients-single-item">For the filling: 150g soft brown sugar</li><li class="ingredients-single-item">2 tbsp ground cinnamon</li><li class="ingredients-single-item">1 tsp ground cardamom</li><li class="ingredients-single-item">50g unsalted butter, softened</li><li class="ingredients-single-item">For the glaze: 100g powdered sugar</li><li class="ingredients-single-item">2 tbsp water</li><li class="ingredients-single-item">1 tsp vanilla extract</li></ul>

Equipment

<ul class="equipment-main-list"><li class="equipment-single-item">Stand mixer with dough hook</li><li class="equipment-single-item">Rolling pin</li><li class="equipment-single-item">Pastry brush</li><li class="equipment-single-item">Bench scraper</li><li class="equipment-single-item">Baking sheets</li><li class="equipment-single-item">Parchment paper</li></ul>

Directions

<ol class="no-list-style"><li class="MethodStepper"><h4 class="step-title">Step 1</h4>Begin by ensuring your sourdough starter is active and bubbly. For best results, feed it 8-12 hours before making the dough. In the bowl of a stand mixer, combine the sourdough starter, bread flour, sugar, salt, cold milk, and eggs. Mix on low speed for 2 minutes until combined, then increase to medium speed and knead for 8-10 minutes until the dough becomes smooth and elastic.</li><li class="MethodStepper"><h4 class="step-title">Step 2</h4>With the mixer running on medium speed, gradually add the 100g softened butter, about 25g at a time, waiting until each addition is fully incorporated before adding more. This slow addition ensures proper emulsification of the fat into the dough. Continue to mix for 5-7 minutes after all butter is added until the dough passes the "windowpane test" - you should be able to stretch a small piece of dough thin enough to see light through without tearing.</li><li class="MethodStepper"><h4 class="step-title">Step 3</h4>Transfer the dough to a lightly oiled bowl, cover with plastic wrap, and let it rest at room temperature (about 22°C) for 2 hours. The dough won't rise dramatically at this stage - the wild yeast works slowly, which is perfect for flavor development. After the rest, refrigerate the dough for 2 hours to firm up, making it easier to work with for lamination.</li><li class="MethodStepper"><h4 class="step-title">Step 4</h4>While the dough chills, prepare your butter block for lamination. Place the 250g cold butter between two pieces of parchment paper and beat it with a rolling pin to soften slightly. Shape it into a flat, even rectangle about 20×15cm. Return to the refrigerator to firm up again, but not harden completely - it should be cold but pliable.</li><li class="MethodStepper"><h4 class="step-title">Step 5</h4>On a lightly floured surface, roll the chilled dough into a rectangle approximately 40×20cm. Place the butter block on one half of the dough, leaving a 1cm border. Fold the other half of dough over the butter and seal the edges by pressing firmly. You now have a butter layer sandwiched between dough layers - the foundation of your lamination.</li><li class="MethodStepper"><h4 class="step-title">Step 6</h4>Perform the first fold: Roll the dough into a rectangle roughly 45×20cm, keeping the edges straight. Fold the dough like a letter - fold the top third down and the bottom third up over it. This is your first "turn." Wrap the dough in plastic wrap and refrigerate for 30 minutes. The resting period allows the gluten to relax and the butter to firm up, preventing it from leaking out during rolling.</li><li class="MethodStepper"><h4 class="step-title">Step 7</h4>Perform a second fold: Rotate the dough 90 degrees (this ensures even distribution of layers), roll it out again to 45×20cm, and repeat the letter fold. Wrap and refrigerate for another 30 minutes. Then perform a third and final fold following the same procedure. After this final fold, wrap the dough well and refrigerate for 24 hours. This long, cold fermentation allows the wild yeast to slowly develop complex flavors while the gluten structure continues to mature.</li><li class="MethodStepper"><h4 class="step-title">Step 8</h4>After 24 hours, make the filling by mixing the brown sugar, cinnamon, and cardamom in a bowl. On a lightly floured surface, roll the cold dough into a rectangle approximately 60×30cm, keeping the thickness even at about 5mm. This large, thin rectangle will give you beautifully defined layers in your finished pastries.</li><li class="MethodStepper"><h4 class="step-title">Step 9</h4>Spread the 50g softened butter evenly over the entire surface of the dough, leaving a 1cm border along one long edge. Sprinkle the cinnamon-sugar mixture evenly over the butter, pressing it gently to adhere. The butter acts as "glue" for your filling and adds richness to each bite.</li><li class="MethodStepper"><h4 class="step-title">Step 10</h4>Starting from the long edge (opposite to the border you left), tightly roll the dough into a log. Use a sharp knife or unflavored dental floss to cut the log into 12 equal pieces, each about 5cm wide. To create the traditional kanelsnurrer shape, press one side of each piece with a chopstick or the handle of a wooden spoon to create an indentation, then twist the piece to form a figure-eight knot. This creates the signature swirl pattern that gives these pastries their name (kanelsnurrer means "cinnamon twists").</li><li class="MethodStepper"><h4 class="step-title">Step 11</h4>Place the shaped kanelsnurrer on baking sheets lined with parchment paper, leaving ample space between each (at least 5cm). Cover loosely with plastic wrap and refrigerate for another 24 hours. This second cold proof further enhances flavor development and creates a more complex texture in the final bake.</li><li class="MethodStepper"><h4 class="step-title">Step 12</h4>Remove the kanelsnurrer from the refrigerator and let them sit at room temperature for 2-3 hours until noticeably puffy but not doubled in size. This final proof allows the wild yeast to activate before baking. The slow rise from the refrigerator creates a more stable structure and enhances the butter layers.</li><li class="MethodStepper"><h4 class="step-title">Step 13</h4>Preheat your oven to 190°C with a rack in the middle position. Bake the kanelsnurrer for 14-16 minutes until deeply golden brown. The high butter content means they brown quickly, so watch carefully in the final minutes. The internal temperature should reach about 88°C when fully baked.</li><li class="MethodStepper"><h4 class="step-title">Step 14</h4>While the pastries are baking, prepare the glaze by whisking together the powdered sugar, water, and vanilla until smooth. The glaze should be thin enough to drizzle but thick enough to adhere to the warm pastries.</li><li class="MethodStepper"><h4 class="step-title">Step 15</h4>Allow the kanelsnurrer to cool on the baking sheets for 5 minutes, then drizzle with the vanilla glaze while still warm. The residual heat helps the glaze to set with a slight sheen. Serve warm or at room temperature. These pastries are best enjoyed the day they're baked, but can be stored in an airtight container for up to 2 days and briefly reheated to refresh.</li></ol>

FAQs

Find answers to your most pressing questions about this delicious recipe right here.

What ingredients are used in Wild Yeast Kanelsnurrer with 48-Hour Cold Proof Recipe?

The key ingredients include active sourdough starter, bread flour, sugar, salt, milk, eggs, butter (for dough and lamination), brown sugar, cinnamon, cardamom, and vanilla. These create beautifully laminated Scandinavian cinnamon twists with complex flavours from wild yeast fermentation.

How to cook Wild Yeast Kanelsnurrer with 48-Hour Cold Proof Recipe at home?

Learn how to cook Wild Yeast Kanelsnurrer with 48-Hour Cold Proof Recipe by creating a sourdough-based dough, performing three lamination folds, cold-fermenting for 48 hours, shaping the signature cinnamon twists, and baking at 190°C until golden brown. The extended fermentation develops complex flavours while creating perfectly flaky layers.

Why does cold fermentation improve pastry flavour and texture?

Cold fermentation allows wild yeast to slowly produce acids and flavour compounds without excessive CO2 production. This creates complex, slightly tangy notes while the extended time improves gluten development. The cold temperature also maintains butter layers better, resulting in superior lamination.

What's the difference between kanelsnurrer and traditional cinnamon rolls?

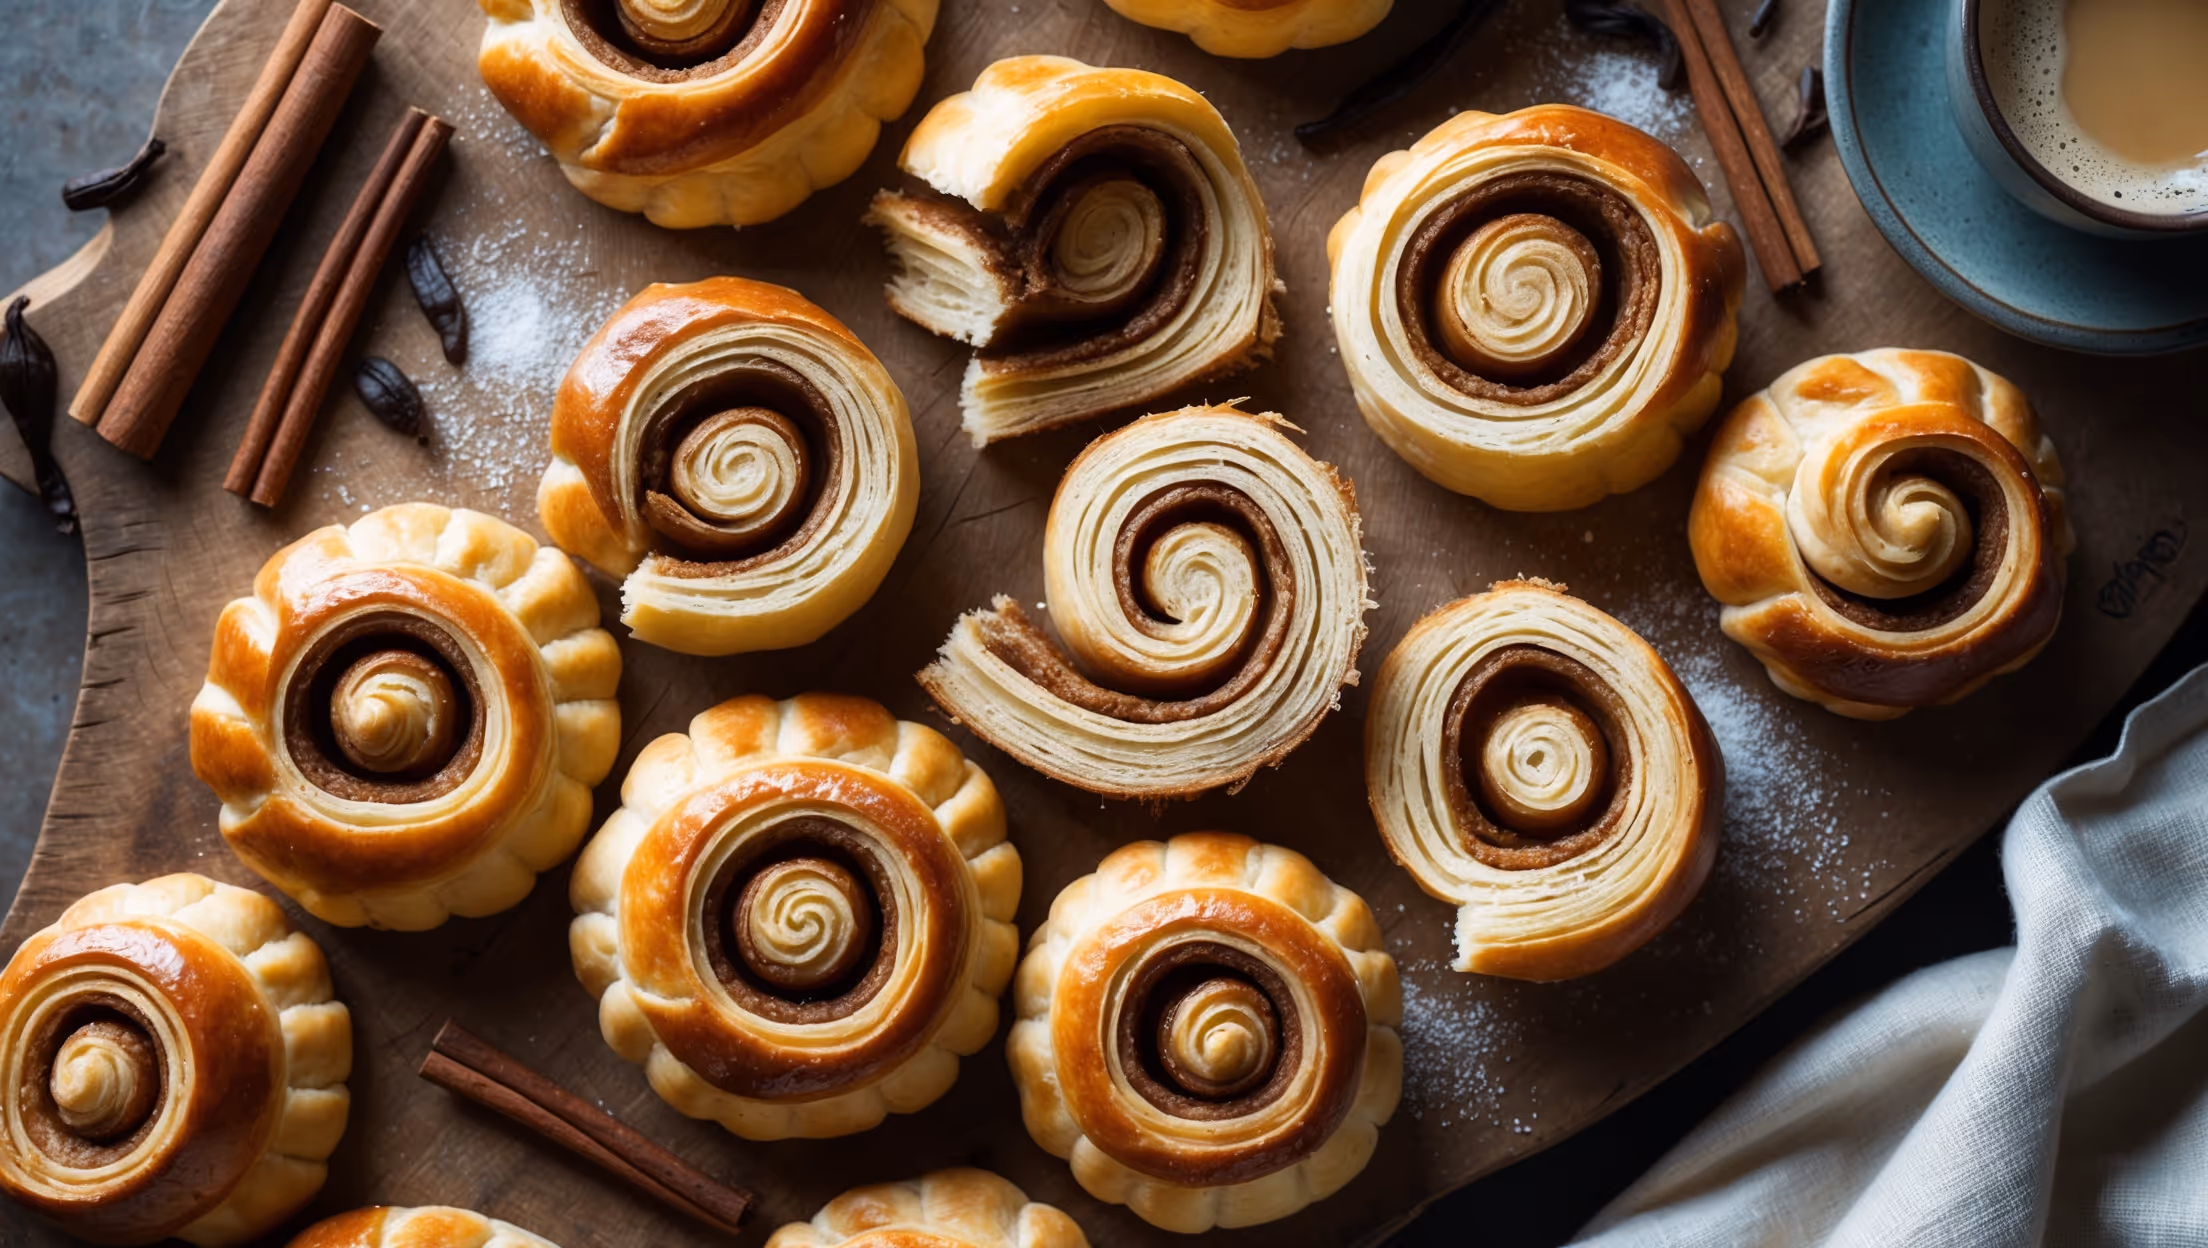
Kanelsnurrer ("cinnamon twists") feature a unique twisted shape compared to spiral cinnamon rolls. They're typically made with laminated dough similar to croissants, creating flaky layers rather than the soft, bread-like texture of American-style cinnamon rolls. The flavour often includes cardamom.

Can I make these Scandinavian pastries without sourdough starter?

Yes, you can substitute the sourdough starter with 7g instant yeast mixed with 125g flour and 125g water (maintain the same total flour/water balance). However, you'll miss the complex flavour development and slight tang that wild yeast provides to authentic kanelsnurrer.

Want to try something else in ...

Danish Pastry

Try following recommended recipes

{ "@context": "http://schema.org/", "@type": "Recipe", "name": "Wild Yeast Kanelsnurrer with 48-Hour Cold Proof Recipe", "author": { "@type": "Person", "name": "Gurbir Aujla", "brand": "What's Baking?", "jobTitle": "Baker" }, "datePublished": "2024-05-05", "description": "Learn how to make authentic homemade kanelsnurrer (Scandinavian cinnamon twists) using wild yeast and a 48-hour cold proof technique for the best flavor development. This foolproof method results in incredibly flaky, aromatic pastries with perfect lamination—better than any bakery version!", "prepTime": "PT1H", "cookTime": "PT15M", "totalTime": "PT49H15M", "keywords": "sourdough cinnamon twists, Scandinavian pastry, wild yeast baking, laminated dough, cold fermentation", "recipeYield": "12", "recipeCategory": "Breakfast", "recipeCuisine": "Scandinavian", "nutrition": { "@type": "NutritionInformation", "calories": "315 calories", "carbohydrateContent": "34 g", "proteinContent": "4 g", "fatContent": "18 g", "saturatedFatContent": "11 g", "cholesterolContent": "85 mg", "sodiumContent": "185 mg", "sugarContent": "14 g", "servingSize": "1 serving" }, "recipeIngredient": [ "250g active sourdough starter (100% hydration)", "500g strong bread flour", "60g granulated sugar", "10g salt", "180ml whole milk, cold", "2 large eggs", "100g unsalted butter, softened", "250g cold unsalted butter, for lamination", "150g soft brown sugar, for filling", "2 tbsp ground cinnamon", "1 tsp ground cardamom", "50g unsalted butter, softened, for filling", "100g powdered sugar, for glaze", "2 tbsp water, for glaze", "1 tsp vanilla extract, for glaze" ], "recipeInstructions": [ { "@type": "HowToStep", "name": "Prepare Dough", "text": "Begin by ensuring your sourdough starter is active and bubbly. For best results, feed it 8-12 hours before making the dough. In the bowl of a stand mixer, combine the sourdough starter, bread flour, sugar, salt, cold milk, and eggs. Mix on low speed for 2 minutes until combined, then increase to medium speed and knead for 8-10 minutes until the dough becomes smooth and elastic." }, { "@type": "HowToStep", "name": "Add Butter", "text": "With the mixer running on medium speed, gradually add the 100g softened butter, about 25g at a time, waiting until each addition is fully incorporated before adding more. This slow addition ensures proper emulsification of the fat into the dough. Continue to mix for 5-7 minutes after all butter is added until the dough passes the 'windowpane test'." }, { "@type": "HowToStep", "name": "Initial Rest", "text": "Transfer the dough to a lightly oiled bowl, cover with plastic wrap, and let it rest at room temperature (about 22°C) for 2 hours. The dough won't rise dramatically at this stage. After the rest, refrigerate the dough for 2 hours to firm up, making it easier to work with for lamination." }, { "@type": "HowToStep", "name": "Prepare Butter Block", "text": "While the dough chills, prepare your butter block for lamination. Place the 250g cold butter between two pieces of parchment paper and beat it with a rolling pin to soften slightly. Shape it into a flat, even rectangle about 20×15cm. Return to the refrigerator to firm up again, but not harden completely." }, { "@type": "HowToStep", "name": "Encase Butter", "text": "On a lightly floured surface, roll the chilled dough into a rectangle approximately 40×20cm. Place the butter block on one half of the dough, leaving a 1cm border. Fold the other half of dough over the butter and seal the edges by pressing firmly." }, { "@type": "HowToStep", "name": "First Fold", "text": "Roll the dough into a rectangle roughly 45×20cm, keeping the edges straight. Fold the dough like a letter - fold the top third down and the bottom third up over it. This is your first 'turn.' Wrap the dough in plastic wrap and refrigerate for 30 minutes." }, { "@type": "HowToStep", "name": "Complete Lamination", "text": "Perform a second fold: Rotate the dough 90 degrees, roll it out again to 45×20cm, and repeat the letter fold. Wrap and refrigerate for another 30 minutes. Then perform a third and final fold following the same procedure. After this final fold, wrap the dough well and refrigerate for 24 hours." }, { "@type": "HowToStep", "name": "Roll and Fill", "text": "After 24 hours, make the filling by mixing the brown sugar, cinnamon, and cardamom in a bowl. On a lightly floured surface, roll the cold dough into a rectangle approximately 60×30cm, keeping the thickness even at about 5mm. Spread the 50g softened butter evenly over the entire surface of the dough, leaving a 1cm border along one long edge. Sprinkle the cinnamon-sugar mixture evenly over the butter." }, { "@type": "HowToStep", "name": "Shape Kanelsnurrer", "text": "Starting from the long edge (opposite to the border you left), tightly roll the dough into a log. Cut the log into 12 equal pieces, each about 5cm wide. To create the traditional kanelsnurrer shape, press one side of each piece with a chopstick or the handle of a wooden spoon to create an indentation, then twist the piece to form a figure-eight knot." }, { "@type": "HowToStep", "name": "Second Cold Proof", "text": "Place the shaped kanelsnurrer on baking sheets lined with parchment paper, leaving ample space between each (at least 5cm). Cover loosely with plastic wrap and refrigerate for another 24 hours for further flavor development." }, { "@type": "HowToStep", "name": "Final Proof", "text": "Remove the kanelsnurrer from the refrigerator and let them sit at room temperature for 2-3 hours until noticeably puffy but not doubled in size. This final proof allows the wild yeast to activate before baking." }, { "@type": "HowToStep", "name": "Bake", "text": "Preheat your oven to 190°C with a rack in the middle position. Bake the kanelsnurrer for 14-16 minutes until deeply golden brown. The internal temperature should reach about 88°C when fully baked." }, { "@type": "HowToStep", "name": "Glaze and Serve", "text": "While the pastries are baking, prepare the glaze by whisking together the powdered sugar, water, and vanilla until smooth. Allow the kanelsnurrer to cool on the baking sheets for 5 minutes, then drizzle with the vanilla glaze while still warm. Serve warm or at room temperature." } ], "aggregateRating": { "@type": "AggregateRating", "ratingValue": "5", "ratingCount": "178" }, "review": [ { "@type": "Review", "author": "Astrid Jørgensen", "datePublished": "2024-05-01", "reviewBody": "As a Dane living abroad, I've been searching for authentic kanelsnurrer, and this recipe is perfect! The wild yeast and long fermentation create that distinctive bakery flavor I've been missing. Worth every minute of waiting.", "name": "Authentic Scandinavian Flavor", "reviewRating": { "@type": "Rating", "ratingValue": "5" } }, { "@type": "Review", "author": "Pietro Rossi", "datePublished": "2024-04-28", "reviewBody": "I'm a professional baker and was skeptical about achieving proper lamination at home, but this method works beautifully! The detailed instructions on butter temperature and folding technique resulted in perfect flaky layers.", "name": "Professional-Quality Results", "reviewRating": { "@type": "Rating", "ratingValue": "5" } }, { "@type": "Review", "author": "Mei-Lin Wong", "datePublished": "2024-04-25", "reviewBody": "The cold proof technique is truly game-changing. I've tried many cinnamon roll recipes before but the flavor development here is exceptional - complex, slightly tangy, with perfect balance between the sweet filling and the pastry.", "name": "Exceptional Flavor Development", "reviewRating": { "@type": "Rating", "ratingValue": "5" } }, { "@type": "Review", "author": "Sven Andersson", "datePublished": "2024-04-22", "reviewBody": "Having grown up in Sweden, I can confirm these kanelsnurrer are better than many bakery versions! The cardamom addition is authentic and the wild yeast makes an incredible difference in texture and taste. Absolutely melts in your mouth!", "name": "Better Than Bakery Version", "reviewRating": { "@type": "Rating", "ratingValue": "5" } }, { "@type": "Review", "author": "Olivia Bennett", "datePublished": "2024-04-18", "reviewBody": "This was my first attempt at laminated dough and while it's definitely a project, the step-by-step instructions made it approachable. The end result was stunning - beautiful swirls, perfect balance of flaky and tender, and absolutely worth the effort!", "name": "Worth the Time Investment", "reviewRating": { "@type": "Rating", "ratingValue": "5" } } ] }
{ "@context": "https://schema.org", "@type": "FAQPage", "mainEntity": [ { "@type": "Question", "name": "What ingredients are used in Wild Yeast Kanelsnurrer with 48-Hour Cold Proof Recipe?", "acceptedAnswer": { "@type": "Answer", "text": "The key ingredients include active sourdough starter, bread flour, sugar, salt, milk, eggs, butter (for dough and lamination), brown sugar, cinnamon, cardamom, and vanilla. These create beautifully laminated Scandinavian cinnamon twists with complex flavours from wild yeast fermentation." } }, { "@type": "Question", "name": "How to cook Wild Yeast Kanelsnurrer with 48-Hour Cold Proof Recipe at home?", "acceptedAnswer": { "@type": "Answer", "text": "Learn how to cook Wild Yeast Kanelsnurrer with 48-Hour Cold Proof Recipe by creating a sourdough-based dough, performing three lamination folds, cold-fermenting for 48 hours, shaping the signature cinnamon twists, and baking at 190°C until golden brown. The extended fermentation develops complex flavours while creating perfectly flaky layers." } }, { "@type": "Question", "name": "Why does cold fermentation improve pastry flavour and texture?", "acceptedAnswer": { "@type": "Answer", "text": "Cold fermentation allows wild yeast to slowly produce acids and flavour compounds without excessive CO2 production. This creates complex, slightly tangy notes while the extended time improves gluten development. The cold temperature also maintains butter layers better, resulting in superior lamination." } }, { "@type": "Question", "name": "What's the difference between kanelsnurrer and traditional cinnamon rolls?", "acceptedAnswer": { "@type": "Answer", "text": "Kanelsnurrer (\"cinnamon twists\") feature a unique twisted shape compared to spiral cinnamon rolls. They're typically made with laminated dough similar to croissants, creating flaky layers rather than the soft, bread-like texture of American-style cinnamon rolls. The flavour often includes cardamom." } }, { "@type": "Question", "name": "Can I make these Scandinavian pastries without sourdough starter?", "acceptedAnswer": { "@type": "Answer", "text": "Yes, you can substitute the sourdough starter with 7g instant yeast mixed with 125g flour and 125g water (maintain the same total flour/water balance). However, you'll miss the complex flavour development and slight tang that wild yeast provides to authentic kanelsnurrer." } } ] }